Dive Into Mermaid Pose with This Step-by-Step Guide
Dive into the advanced hip and heart opener with this step-by-step guide.
By Ingrid Yang•
Benefits of Mermaid Pose
How to Do Mermaid Pose Properly
How to Build Up to Mermaid Pose
Common Mermaid Pose Variations
Common Mistakes In Mermaid Pose
Precautions to Take During Mermaid Pose
Tips for Practicing Mermaid Pose
There’s something undeniably captivating about Mermaid Pose. The first time you see it, it looks almost mythical, like watching a wave curl perfectly over itself, equal parts strength and elegance. It’s a pose that doesn’t just stretch your body; it feels like it tells a story: open heart, lifted gaze, hips grounded and steady as your spine arcs upward.
Mermaid Pose (Eka Pada Rajakapotasana variation) requires a blend of strength and flexibility. As Peloton instructor Aditi Shah says, “it’s not just about backbending, but also lengthening and then opening the chest and the shoulders.” Lifting the heart up toward the ceiling creates a sense of openness and expansiveness.
It’s also a pose that invites curiosity. You might see it in a yoga class and think, “How does anyone even get there?” The truth is, Mermaid isn’t about contortion or forcing your body into some impressive shape. It’s about patience, intentional preparation, and a willingness to meet yourself exactly where you are.
Benefits of Mermaid Pose
Mermaid Pose offers a powerful combination of flexibility, strength, and alignment benefits. It really opens up the hips, chest, and shoulders while also strengthening the back and lengthening the spine.
Altogether, the pose improves mobility, balances the muscles around the pelvis, and relieves tension in the entire front of the body—improving posture and counteracting the effects of prolonged sitting.
During Mermaid, Aditi says it’s important to focus on creating an even curve in the spine “so that the entire backbend isn't just coming from the lower back.” This approach protects the lower back while promoting strength and control throughout the spine. Focusing on lifting and opening the chest also encourages flexibility in the upper back as well, she adds.
This combination of elements makes Mermaid both expansive and stabilizing. The pose not only enhances spinal mobility and opens the chest and shoulders, but also fosters greater body awareness, control, and ease of movement well beyond the mat.
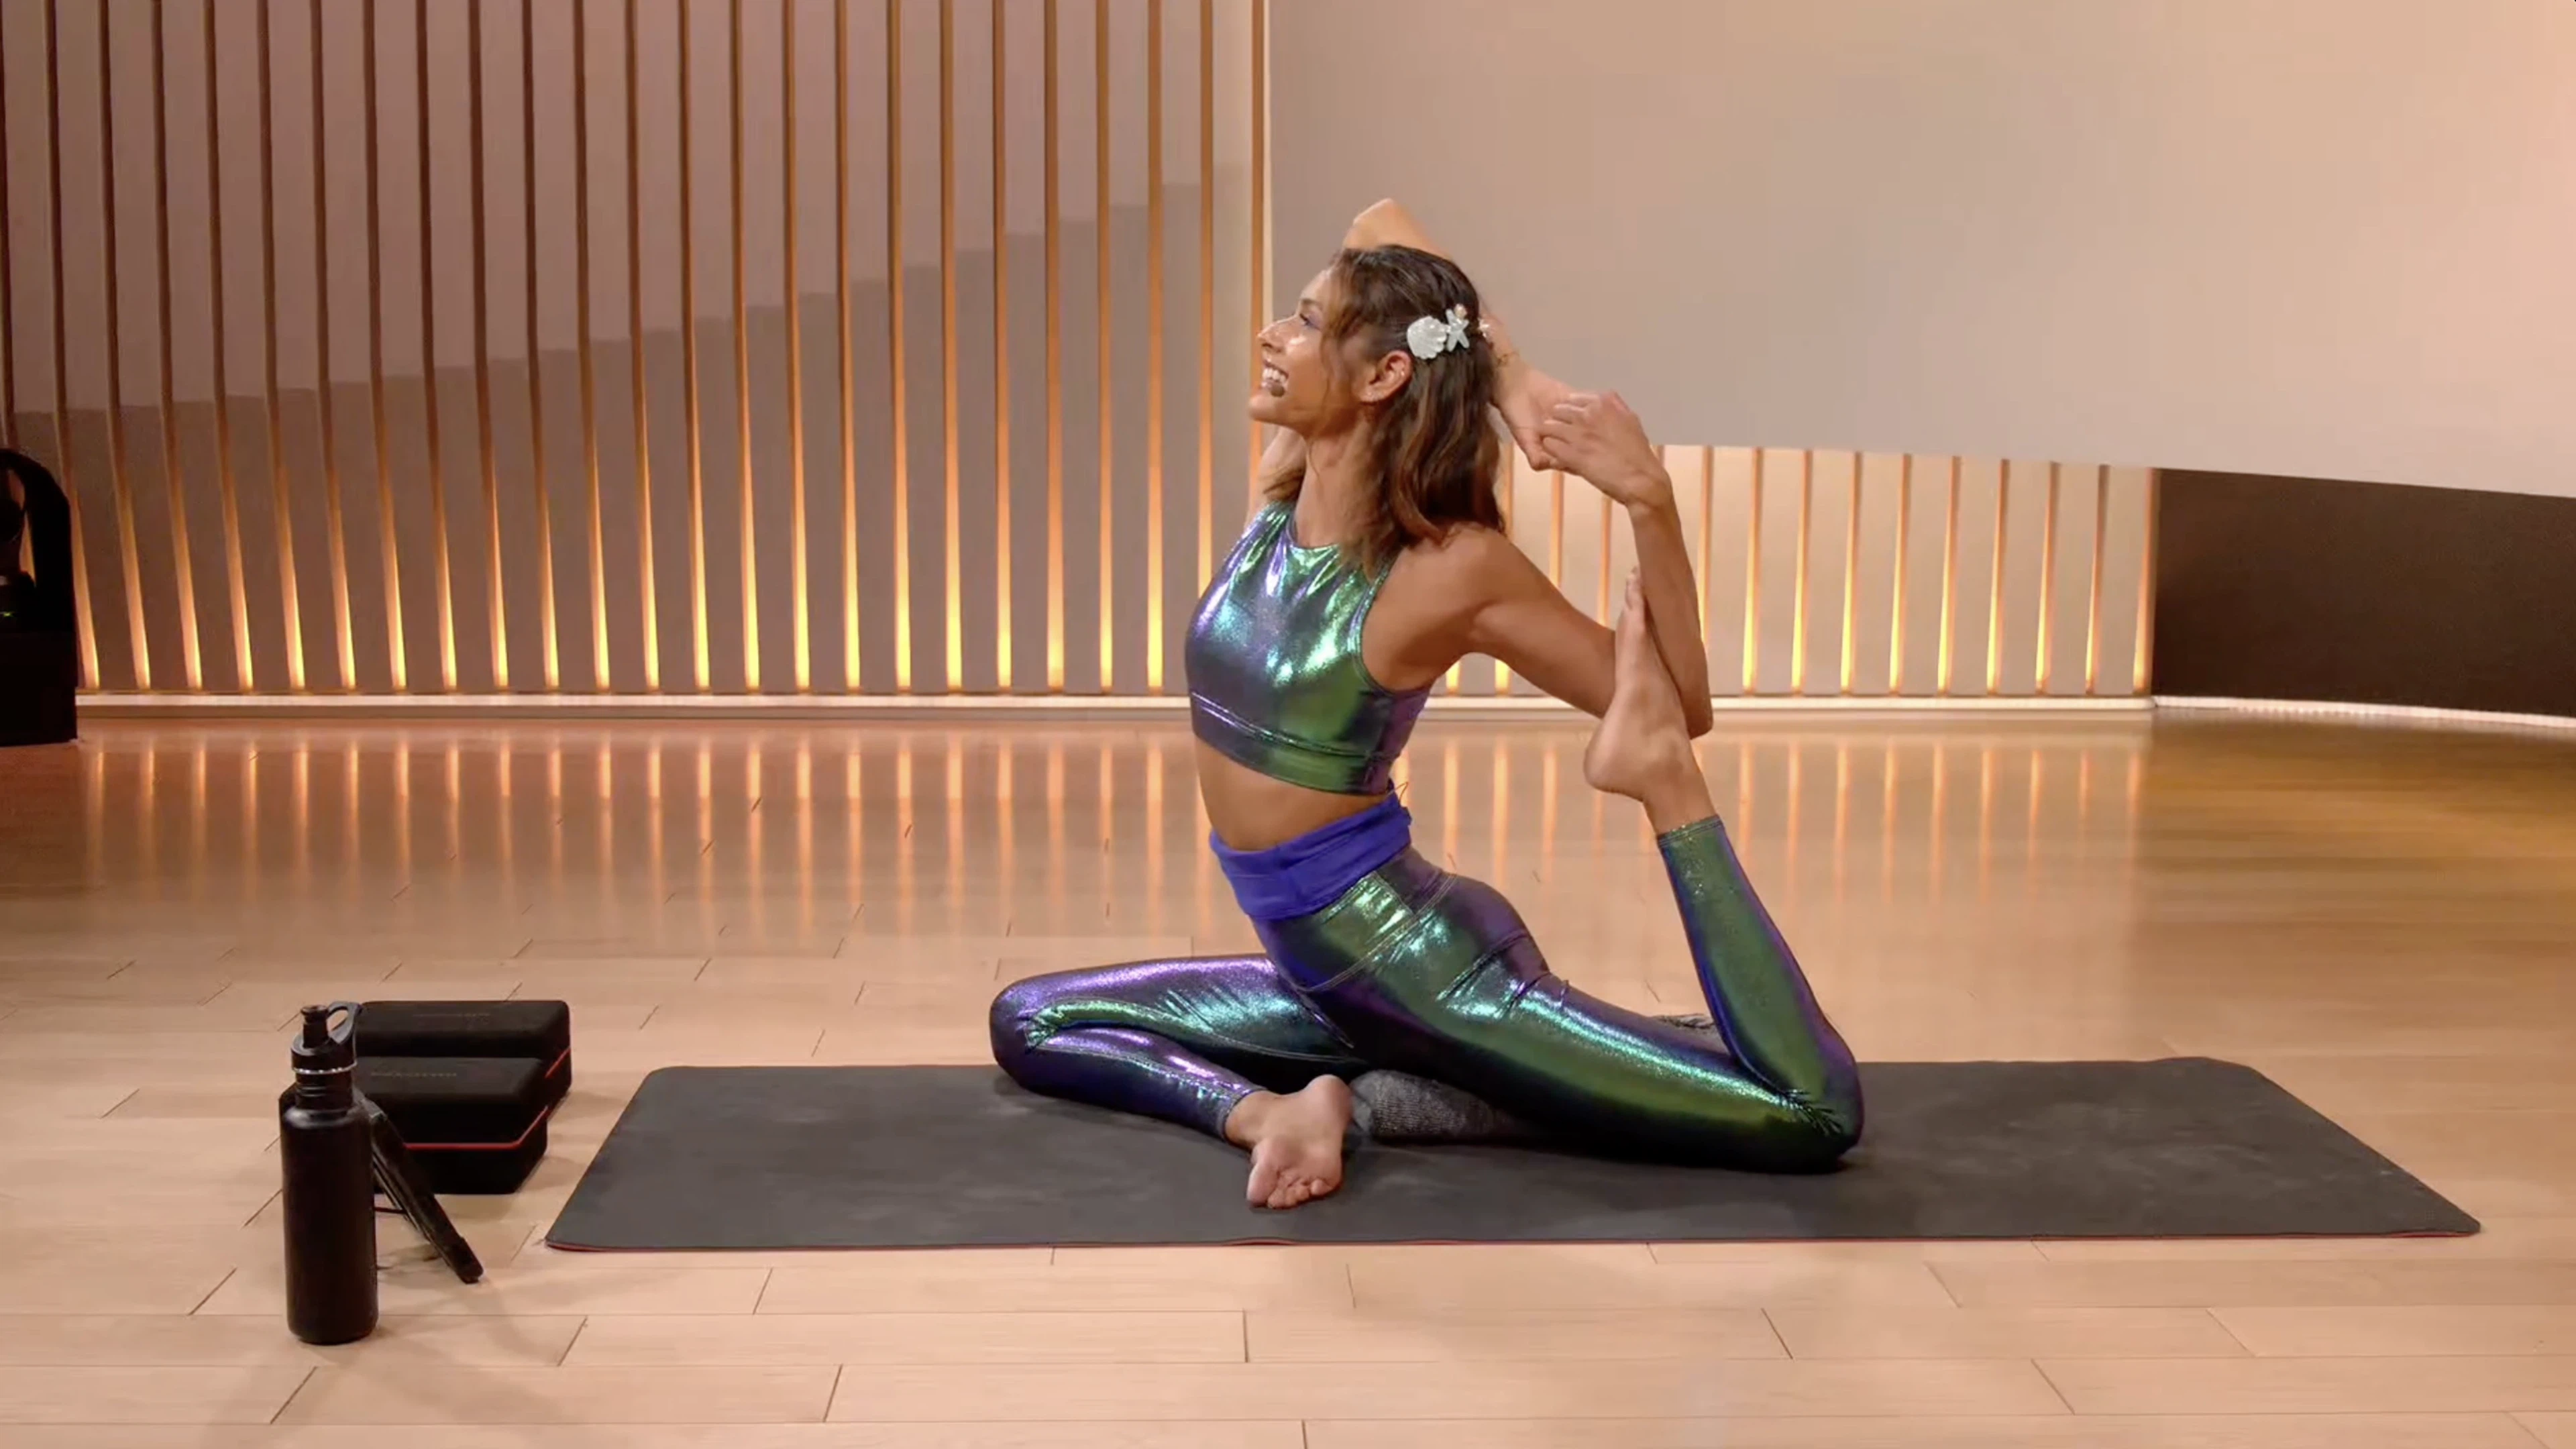
How to Do Mermaid Pose Properly
While it looks seamless from the outside, Mermaid Pose is actually a series of deliberate steps. These build on one another to gradually open the hips, spine, and shoulders, creating both stability and lift.
Follow these steps to enter Mermaid Pose safely:
From Downward-Facing Dog (Adho Mukha Svanasana), move into Pigeon Pose (Eka Pada Rajakapotasana) by bringing your right shin forward and placing it on the floor beneath your torso. Extend your left leg straight backward, resting your left knee and the top of the left foot on the floor, squaring your hips.
Rise up on your fingertips or use blocks under your hands to lift your torso, crown of the head reaching toward the ceiling. Engage your core to lengthen your spine and avoid collapsing into the lower back and front hip.
Bend your left knee and reach your left hand back to hold the top of your left foot or ankle. If that’s not accessible, loop a strap around your back foot and hold the strap instead.
Begin the bind: Hook your foot into the crook of your left elbow, keeping your chest lifted.
Sweep your right arm up and overhead, then bend your elbow to reach your right hand toward your left, and clasp your hands behind your head.
Draw your sternum upward. Imagine a balloon attached to your sternum is gently rising, allowing your chest to float up toward the ceiling, Aditi says.
Hold for 3-5 breaths. Stay grounded through your hips and steady through your breath before slowly releasing and repeating on the other side.
How to Build Up to Mermaid Pose
If you’re not there yet, you’re exactly where you’re meant to be. Building the foundations is not just prep; it is the practice. Aditi explains that each component—hips, quads, shoulders, and spine—has its own preparatory work.
She suggests incorporating these into your regular practice:
Hip Openers: Pigeon Pose, Lizard Pose (Utthan Pristhasana), and Ankle-to-Knee Pose (Agnistambhasana) help create space in the hips.
Quad Stretches: Low Lunge (Anjaneyasana) with a gentle quad hold opens the front thigh and hip flexors.
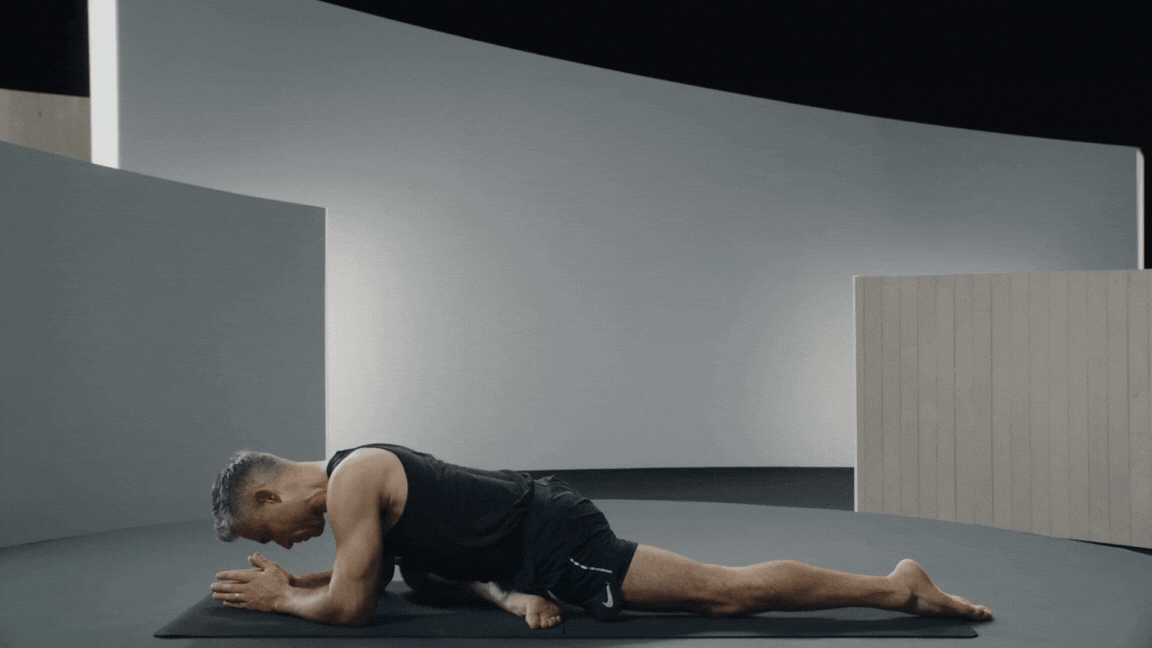
Prone Backbends: Cobra (Bhujangasana) and Locust (Salabhasana) strengthen the spinal extensors while lifting the chest.
Shoulder and Chest Openers: Cow Face Pose (Gomukhasana) arms preps your arms and shoulders for the bind.
“It’s important to stay consistent,” Aditi says. “Things take time, so there’s no rush. Even if it’s something you’re used to doing, today might be different. Meet yourself where you are and notice what you’re feeling in your body as you go.”


Common Mermaid Pose Variations
Part of the beauty of Mermaid Pose is how adaptable it is. Whether you’re new to the posture or working on deepening it, there’s a version that can support your practice.
Here are a few variations to explore:
Upright Chest Lift: Focus entirely on the chest and spine by staying upright in Pigeon and lifting through the sternum without grabbing the back foot at all.
Half Mermaid: Start in Pigeon Pose and reach one hand back to hold your foot. No bind, no overhead arm, just begin to open the quad and shoulder.
Strap-Assisted Mermaid: If the bind isn’t accessible, use a yoga strap looped around your back foot and held overhead. This builds shoulder mobility without strain.
Wall-Supported Mermaid: Position yourself so a wall is next to you on the same side as your back leg. With your front leg in Pigeon, press the foot into the wall for balance. Stay here with the back leg extended along the wall, or bend your knee and reach backward to move into the bind.
Extended Mermaid (Advanced): Once you’re steady in the classic bind, gently press your foot deeper into the crook of your elbow and experiment with straightening the back leg slightly. This variation offers a big pectoral stretch, but only if your shoulders are ready.
You don’t have to master every variation. Think of them as options along a path, each one offering something different, depending on your body that day.
Common Mistakes In Mermaid Pose
Mermaid Pose can be deceptively challenging. While it looks fluid, it asks for strength, control, and a lot of awareness. Pushing too quickly into the full expression can lead to frustration or even injury.
Here are some common pitfalls to watch for:
Forcing the Shape: Don’t muscle into the bind. “It’s super important to take it step-by-step,” Aditi says, ensuring that each stage of the pose maintains a balance of effort and ease.
Collapsing Into the Lower Back: Engage your core and think of lengthening your spine, not arching backward. Keep the backbend evenly distributed.
Having Uneven Hips: If your pelvis tilts or twists, it can throw off the stretch. If needed, place a block or folded blanket under the hip of your front leg to help keep your foundation stable.
Skipping the Prep: Without warming up the hips, quads, and shoulders, the pose can feel inaccessible. Slow, steady preparation is key.
If you ever feel strain or sharp discomfort, back out and return to an earlier variation. You’re not “going backward,” you’re just practicing intelligently.


Precautions to Take During Mermaid Pose
Because Mermaid Pose is advanced, it requires mindful preparation and body awareness. Keep these points in mind:
Avoid If You Have Injuries: Especially in the knees, hips, shoulders, or lower back.
Warm Up Thoroughly: Spend time in hip openers, quad stretches, and gentle backbends first.
Respect Your Limits: Every day will feel different; honor how your body shows up today.
Use Props Liberally: There’s no rush to drop the support. Props make this pose safer and more sustainable.
Aditi suggests you approach it like running. “Not every day is going to be a personal best,” she says. “Whatever your body is telling you is what you should listen to, and just go as far as feels right for you.”
Tips for Practicing Mermaid Pose
“There’s no rush. Consistency is way more important than just nailing something the first time,” Aditi says. “Stay embodied, listen to your body.” The key is to meet yourself where you are.
Start with a balanced warm-up (hips, spine, shoulders).
Use props like blocks and straps.
Celebrate small progress: steadier balance, deeper breath, gentler bind.
Let go of the finish line mentality and stay present.
Mermaid Pose is more than a beautiful shape, it’s an exploration of grace, strength, and self-trust. With time, prep, and patience, it becomes a posture not just of flexibility but of freedom.
“There is no ‘right’ in yoga,” Aditi reminds us. “Moving in the direction of the pose is the point. It’s about what it feels like inside rather than what it looks like outside.”
For more guidance, try taking a guided yoga class that includes Mermaid Pose on the Peloton App, including any of the below.


This content is for informational and educational purposes only and does not constitute individualized advice. It is not intended to replace professional medical evaluation, diagnosis, or treatment. Seek the advice of your physician for questions you may have regarding your health or a medical condition. If you are having a medical emergency, call your physician or 911 immediately.

Level up your inbox.
Subscribe for a weekly dose of fitness, plus the latest promos, launches, and events.
By providing your email address, you agree to receive marketing communications from Peloton.
For more about how we use your information, see our Privacy Policy.