
Michela Ravasio/Stocksy
New to Yoga? Start By Practicing These 5 Beginner-Friendly Poses
Build your yoga routine at your own pace.
By Greg Presto•
What Are the Benefits of Yoga?
Different Types of Yoga: An Overview for Beginners
How to Practice Yoga: 11 Exercises to Try
Yoga Tips for Beginners
Here's the truth: You don’t need to be able to balance on your tiptoes or bend yourself into a pretzel to start doing yoga exercises (or experience their many benefits). Still, many beginners feel overwhelmed by the thought of stepping onto the mat for the first time.
Discover more ways to reach your goals with Peloton


“People think yoga is intimidating because they’re worried they aren’t flexible enough and need to be like Gumby,” says Peloton instructor Kristin McGee. “Yoga will help you get more flexible, so you don’t need to start out flexible.”
You can form a practice that feels good for your body by focusing on one pose at a time and advancing at your own pace. Below, experts share advice and provide step-by-step instructions on how to do some of the most common yoga postures.
What Are the Benefits of Yoga?
A regular yoga practice can do great things for both your physical body and your mental health. As Kristin points out, the word “yoga” is derived from the Sanskrit word that means “to unite,” which is fitting since she says yoga’s “main goal is to help us unite our body with our mind via our breath.” These are just a few of the benefits that come from doing yoga.
Physical Benefits: Practicing yoga can increase your flexibility, boost your upper and lower body strength, and improve your balance.
Mindfulness: People often associate mindfulness with stillness or meditation, but many “find yoga is a more accessible, dynamic, and interesting way to stay in the present moment,” says Anne Cox, PhD, a professor of kinesiology at Washington State University. “You may find your mind is a little bit calmer and a little less all over the place, whether it’s in yoga class specifically or outside the class,” she says.
Stress Relief: Research published in the journal Brain, Behavior, and Immunity in 2022 found that doing yoga can decrease levels of cortisol, your body’s stress hormone. “It actually changes us at a chemical level,” says Lori Rubenstein Fazzio, a physical therapist and clinical professor of yoga and health at Loyola Marymount University.
Improved Mood: When practiced consistently, yoga can improve your mood by increasing the levels of certain chemicals in your brain, such as serotonin.
Reduced Inflammation: Additional research needs to be done to draw a clear conclusion about the relationship between inflammation and yoga. However, a review of 15 studies published in the journal Biological Research for Nursing in 2018 suggests that this form of movement can play a role in reducing chronic inflammation, which lasts anywhere from several months to several years and increases your risk for health issues including cardiovascular disease, Alzheimer’s, and certain cancers.


Different Types of Yoga: An Overview for Beginners
There are so many different types of yoga to explore. Some are more fast-paced, like Ashtanga, while others focus on holding poses for an extended period of time, like Yin Yoga. Here’s a quick rundown of the different styles you might encounter, plus expert advice on which ones are optimal for beginners.
Ashtanga Yoga: This vigorous type of yoga challenges your strength and endurance as you move rapidly between poses. Fazzio suggests waiting to try it until you’re comfortable moving through the basic yoga postures.
Vinyasa Yoga: In Vinyasa flows, poses are strung together in sequences. You go straight from one pose to the next, linking your movements to your breath.
Hatha Yoga: While doing this slow, controlled type of yoga, you hold poses for longer periods of time than you would while doing Vinyasa yoga, for example. What’s more, the poses in Hatha yoga aren’t always tied together in a sequence.
Yin Yoga: This is another slow type of yoga. While practicing Yin Yoga, you relax into a posture for an extended period of time (often several minutes).
Iyengar Yoga: This style focuses on your form in each posture and incorporates props and tools to help you properly align your body.
Chair Yoga: As its name suggests, this type of yoga incorporates a chair as a prop. You stay seated in the chair while doing different postures, making them more accessible and less strenuous.
Restorative Yoga: This style of yoga often incorporates blankets and pillows for added support and comfort. It's great for stress reduction and rest days, Fazzio says.
If you're planning to kick off your yoga practice with guided classes, Fazzio suggests starting with a slower, more relaxed type—like Hatha yoga, Yin Yoga, or restorative yoga. You'll spend more time in each pose, allowing you to relax into the posture and stay attuned to your breath. And of course, you don’t have to choose just one style to practice.
How to Practice Yoga: 11 Exercises to Try
Instructors typically queue different poses in each yoga class. Even so, you’re likely to encounter some (if not all) of the poses below in a beginner-friendly flow. Here are step-by-step instructions on how to do each one at home.
1. Downward Facing Dog (Adho Mukha Svanasana)

Downward Facing Dog, Adho Mukha Svanasana in Sanskrit, in one of the most well-known yoga poses. As Kristin points out, this pose is a gentle inversion, meaning your head is lower than your heart. “It really strengthens and stretches your entire body,” she says.
Start in a high plank, positioning your hands directly below your shoulders. Your body should form a straight line from your head to your heels. Take an inhale.
Keeping your arms straight but not locked, press your hands into the ground as you exhale and slowly lift your hips toward the ceiling as your chest reaches toward your thighs. Your legs can remain straight, or you can slightly bend your knees.
Spread your fingers wide and grip your mat. Press the backs of your thighs toward the wall behind you.
Take two to four breaths in this position.
Beginner’s tip: Your heels don’t need to touch the floor. In fact, depending on your unique skeleton, it may not even be possible, Fazzio says. Feel a stretch through the back of your legs, but don’t sacrifice your form or comfort to force your heels to the floor.
2. Mountain Pose (Tadasana)

This pose, known as Tadasana in Sanskrit, may look no different than a regular standing position at first glance, but your form is still crucial. “You’re not standing in a collapsed posture, but you’re actually activating your body. So it’s like you’re trying to get taller,” Fazzio says.
Holding yourself upright also works the small muscles in your back. "It teaches us how to stand tall and find our midline and correct posture," Kristin says, adding that she practices Mountain Pose throughout her day, even when she's not on the mat.
Stand with your feet together and your arms at your sides. Both palms should face inward.
Spread your toes, press your feet into the mat, and tense your leg muscles.
Draw your shoulder blades down and together.
Take two to four breaths in this position.
Beginner’s tip: To keep your spine upright, Fazzio says to “imagine your head reaching up to the ceiling and your feet anchoring down into the floor."
3. Tree Pose (Vrikshasana)

If you spend a lot of time sitting, try Tree Pose (Vrikshasana). “Our core can get weak if we sit or slouch,” Kristin says. “Tree combats that while also strengthening our legs and helping us find more focus and concentration.”
Start in Mountain Pose. Inhale.
As you exhale, place your hands on your hips.
Raise your left leg and place the bottom of your left foot either on the inside of your right shin or the inside of your right thigh. Make sure you don’t place it on your knee.
Square your shoulders and hips to the front. Press your left foot and right leg together. Gaze forward.
If you feel balanced, fold your hands in front of your heart or reach them overhead.
Take a few breaths in this position before returning to Mountain Pose. Repeat these movements on the other side.
Beginner’s tip: To help maintain your balance, focus on a single spot in front of you and keep your eyes locked on it while holding this pose.
4. Warrior 2 (Virabhadrasana 2)

You’ll likely encounter Warrior 2 (Virabhadrasana 2) in your classes. This lunge variation is great for improving your balance and strengthening your legs.
Stand facing the long edge of the mat with your feet flat on the floor in a wide stance.
Turn your right foot and knee to face the front of the mat. Angle your left toes slightly inward.
Bend your right knee so that it points toward your middle toe and stacks over your right ankle. Press down through the outer edge of your left foot. Keep your chest proud and your head up.
Extend your arms outward from your shoulders. Now, turn your head to look forward over your right fingers.
Hold this pose for a few deep breaths, then straighten your right knee to return to a standing position. Repeat on the other side.
Beginner’s tip: If you feel pain while holding Warrior 2, ease up. People often try to rotate their hips more than they should in this pose, which can cause injuries, Fazzio says. Listen to your body and don’t force any extreme movements.
5. Cat Pose (Marjariasana) and Cow Pose (Bitilasana)

Cat Pose (Marjariasana) and Cow Pose (Bitilasana) will help stretch your back and spine and improve flexibility.
Start on all fours, making sure your wrists are directly under your shoulders and your knees are in line with your hips.
To move into Cat Pose, exhale while arching your back and dropping your chin toward your chest. Scoop your tailbone toward your mat and keep your eyes on your thighs.
To move into Cow Pose, inhale and arch your back in the opposite direction. Lift your chin and tailbone and keep your gaze toward the ceiling.
Move between both poses with each inhale and exhale.
6. Chair Pose (Utkatasana)

Chair Pose, known as Utkatasana in Sanskrit, is a standing posture that activates your glutes and engages your core and quads.
Begin by standing up straight with your feet together and your arms by your sides.
Raise your hands overhead with your palms facing inward. Position them by your ears.
Slowly bend your knees and lower your hips back, as if you’re sitting on a chair.
Keep your weight in your heels to avoid tipping forward. Hold this position for several breaths.
7. Child’s Pose (Balasana)

Child’s Pose, known as Balasana in Sanskrit, opens your hips and stretches your back muscles.
Start in a kneeling position with your shins flat on the ground.
Push your hips back over your heels. Open your knees so they're wider than your torso.
Begin walking your arms straight forward on the floor until your stomach meets your thighs and your forehead meets the floor. Hold this position while breathing deeply.
8. Happy Baby (Ananda Balasana)
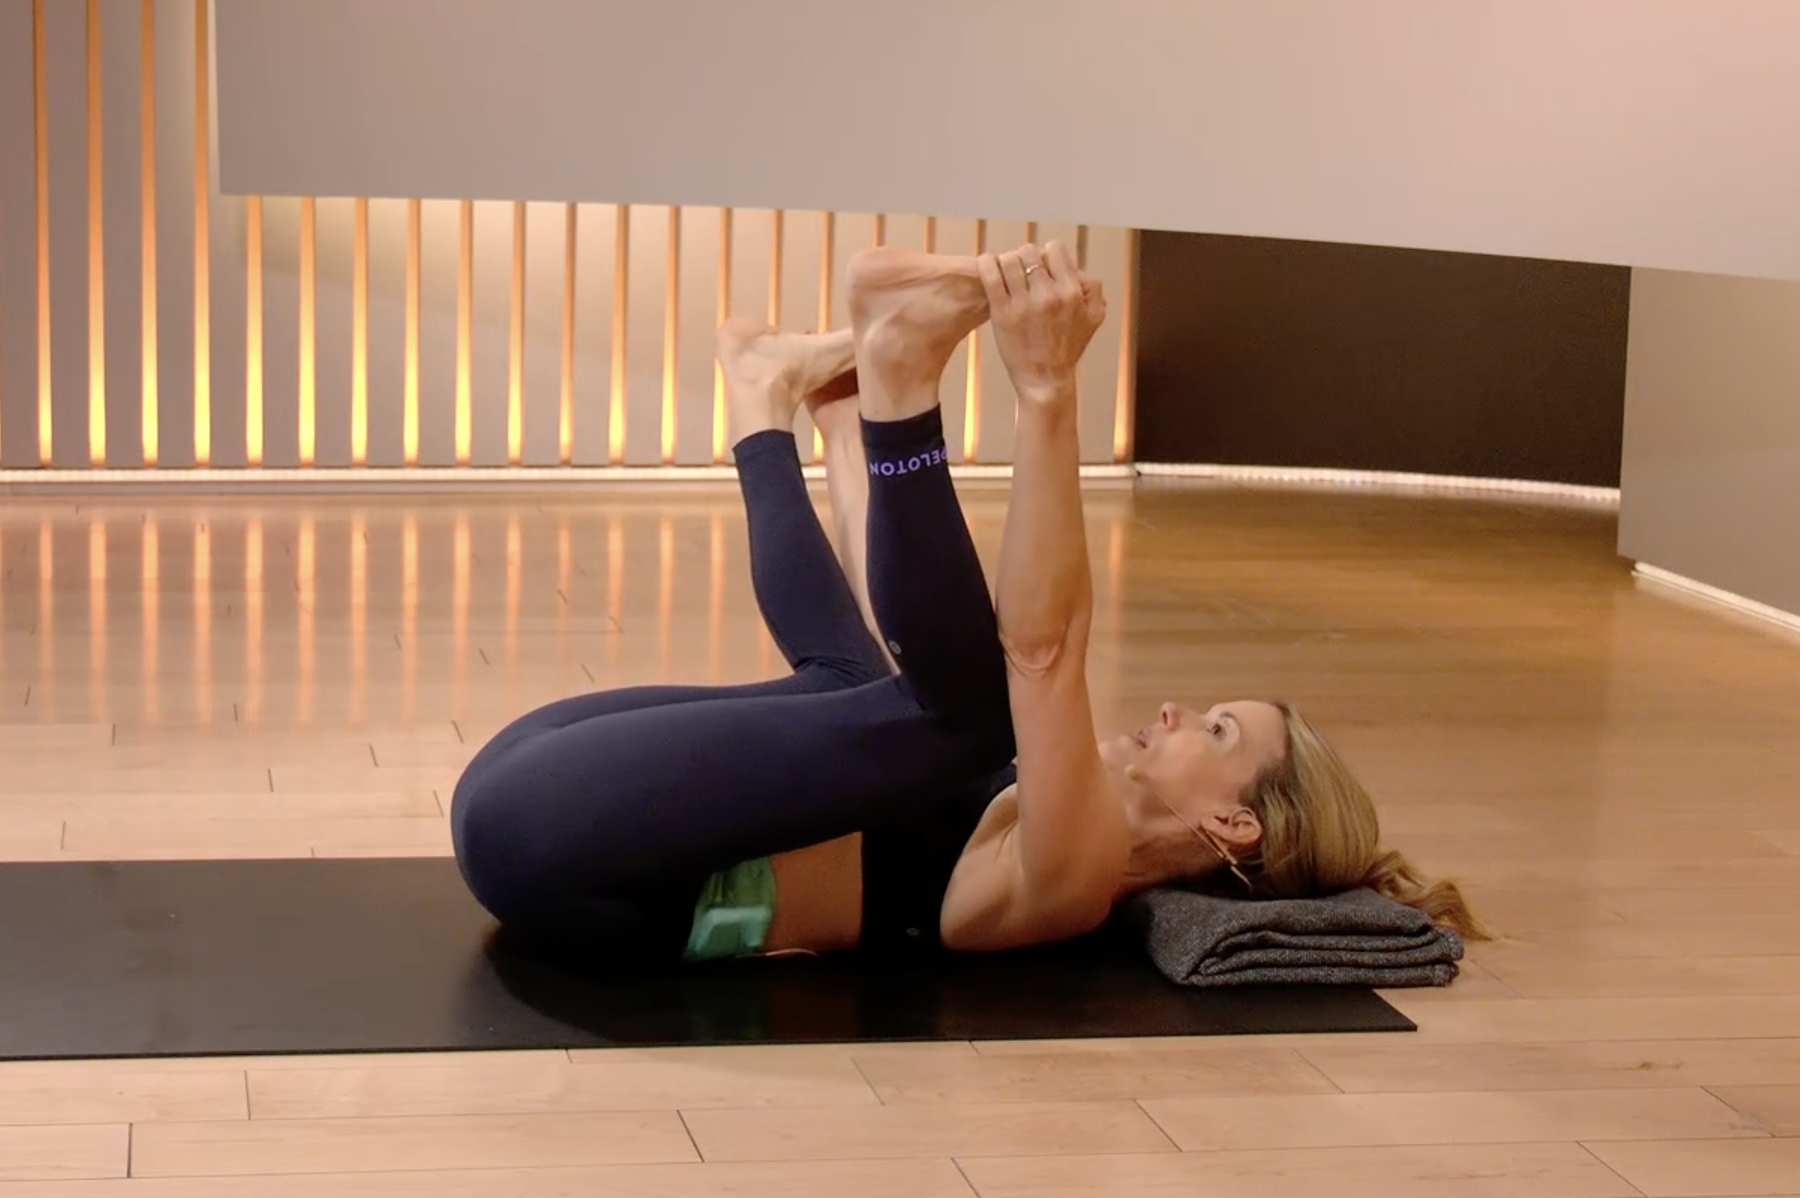
Known as Ananda Balasana in Sanskrit, this pose opens your hips and massages your lower back.
Begin by lying on your back with your knees bent and your feet flat on the floor.
Pull your knees over your chest and toward your armpits, with the soles of your feet facing the ceiling.
Reach your arms through your legs and grab the soles of your feet or your big toes (whichever you can reach more comfortably). Gently pull your knees toward the floor. Keep your lower back firmly pressed to your mat.
You can slowly rock back and forth to massage your lower back if it’s tight.
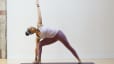
9. Triangle Pose (Trikonasana)
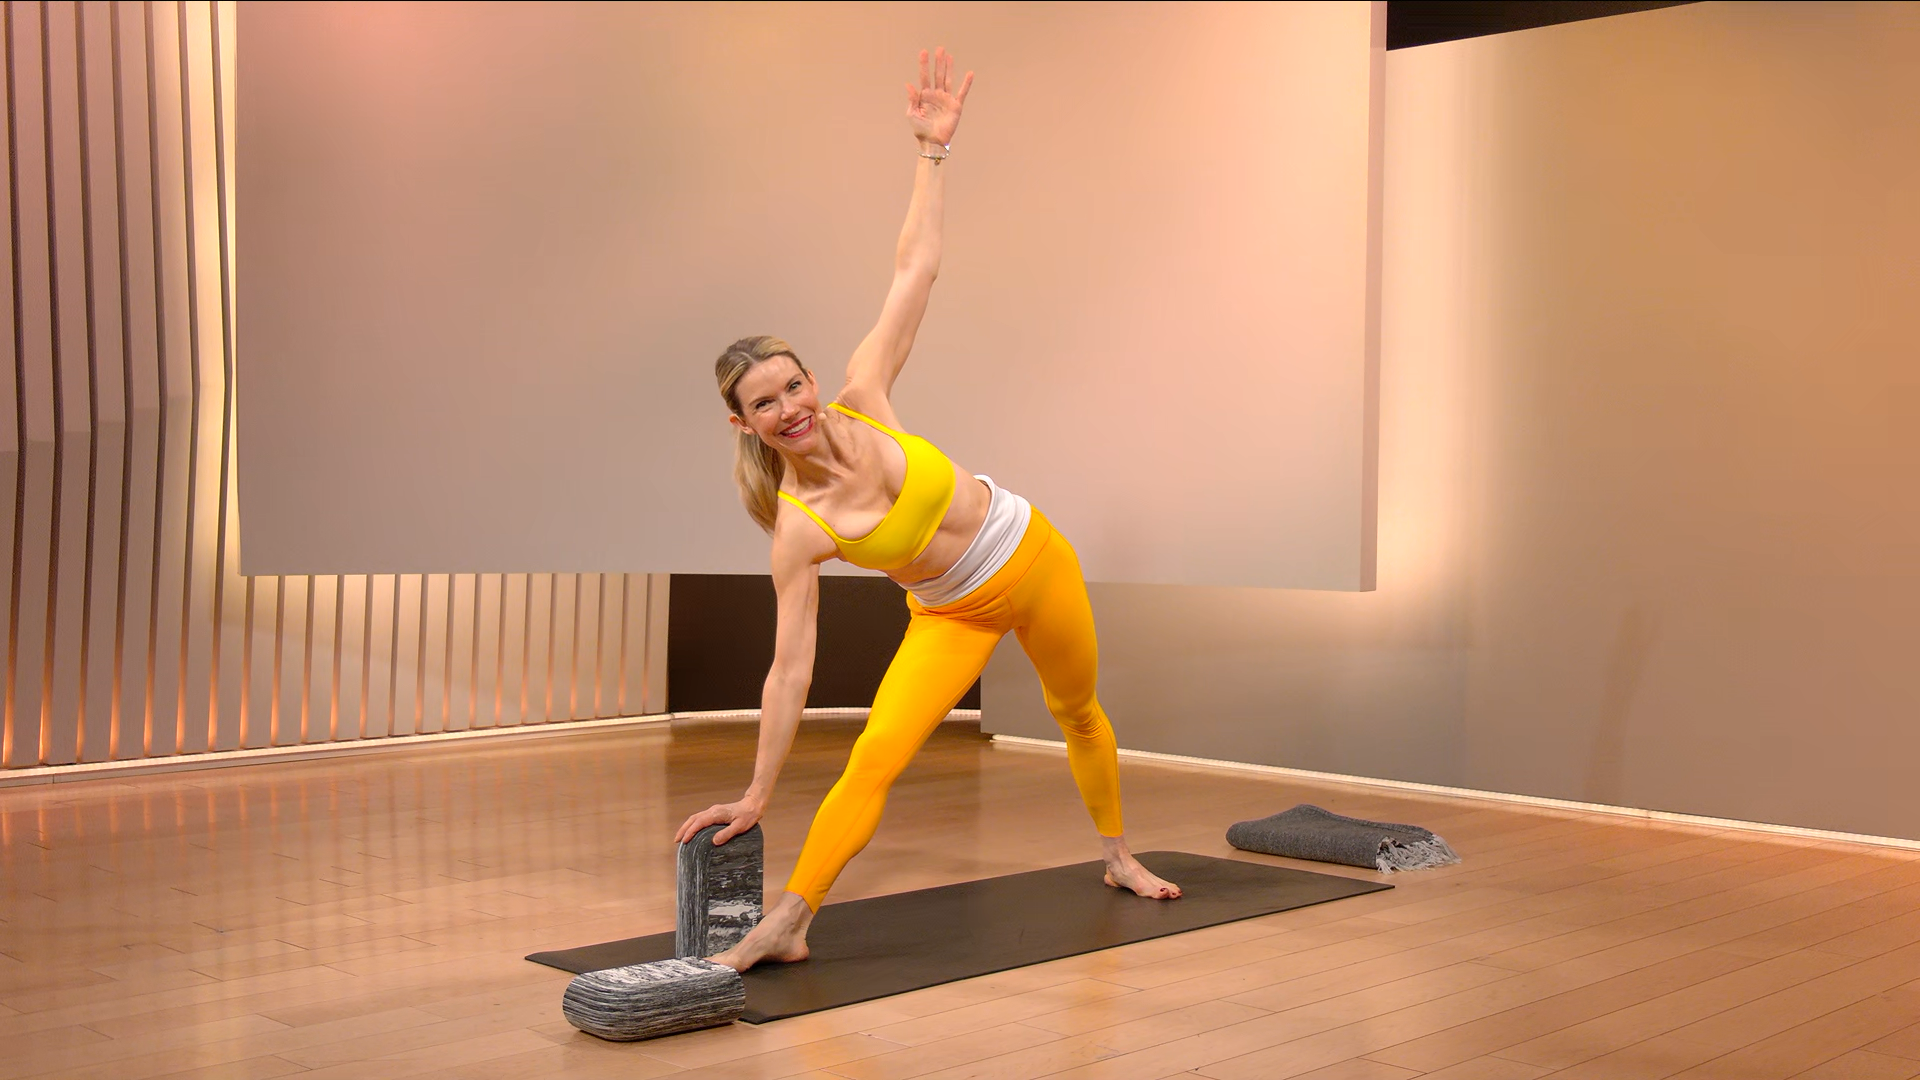
Triangle Pose (Trikonasana) "stretches the side body, which we don't do enough, and it strengthens our legs and core and entire body," says Kristin.
Start in Warrior 2 Pose, leading with your right leg. Take an inhale and an exhale in this posture.
Keep a slight bend in your right knee as you bring your right hand down to a block on the outside of your right leg. Bring your left hand to your left hip, pressing your hips behind you.
Straighten your right leg and rotate the left side of your body, including your rib cage and shoulder. Take a deep inhale as you reach your left hand straight up. Keep your torso straight.
Root down through your legs and bring your body back upright. Repeat the above steps on the other side.
10. Head to Knee Pose (Janu Sirsasana)
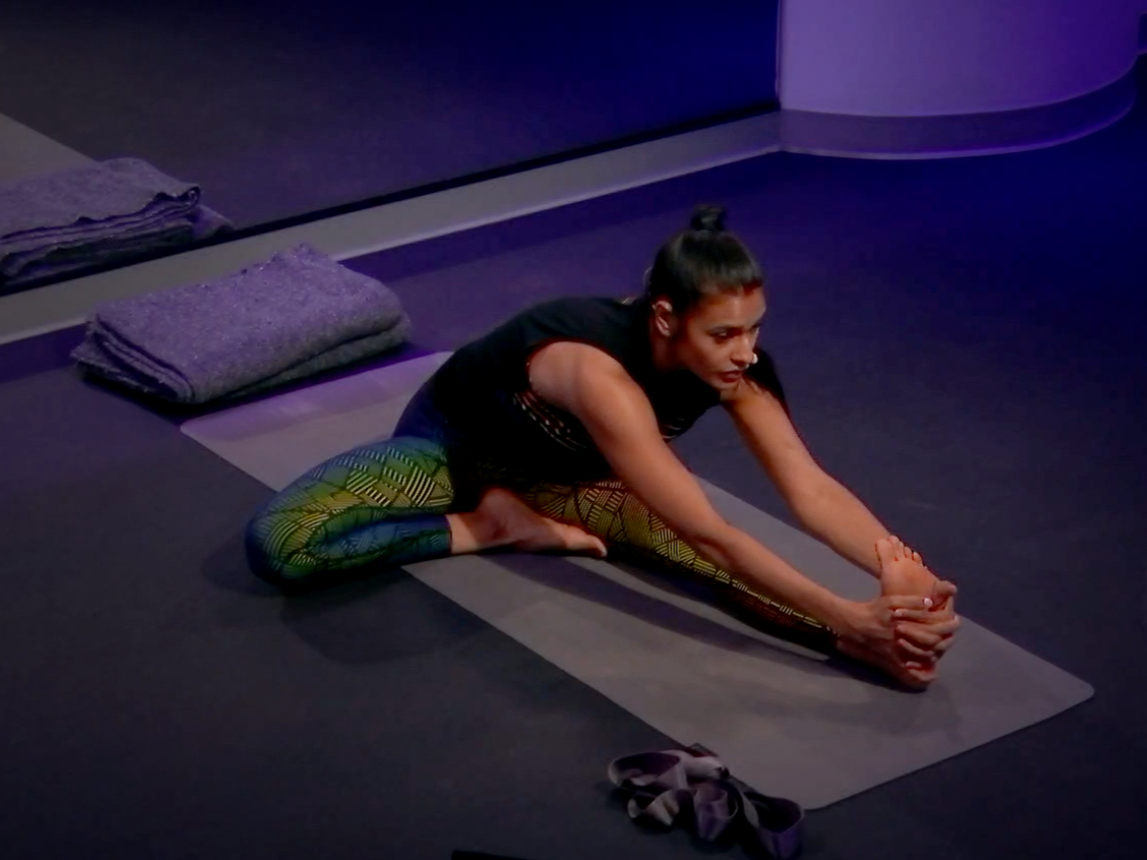
Known as Janu Sirsasana in Sanskrit, this pose is a seated forward fold. "It's also a gentle twist and hip opener, so it gets a lot of areas at once," Kristin says.
Start in a seated position with both legs straight and extended. Keep your torso upright.
Pull your left leg inward and close your knee joint as much as you can. Open this leg to the side, keeping your heel close to your groin.
Fold over your right leg and grab your foot with both hands. Take an inhale and an exhale in this position.
Beginner's tip: If you can't reach your extended foot, wrap a strap or towel around it to make this posture more accessible.
11. Savasana Pose

This pose, which translates to “corpse pose,” is almost always at the end of yoga classes. “For beginners, it’s often the most challenging part of class, because it’s a meditative experience,” Cox says. “Your only job is to try to stay present, which is nearly impossible to do.” So if you’re feeling awkward in this pose as a beginner, you’re actually doing it right, she says.
Lie flat on your back in a relaxed position with your arms at your sides. It's OK for your feet to flop out to the sides.
Close your eyes and relax.
Beginner’s tip: Being still and present isn’t easy, so Cox says to go easy on yourself. If it feels impossible to calm your mind, try doing a short meditation (like this 5-Minute Witness Meditation led by Kristin) while you’re in Savasana Pose. You can also do a short body scan. With each breath, focus on feeling a different part of your body—such as your feet, ankles, and head.
Yoga Tips for Beginners
There’s so much to learn about yoga, so don’t feel like you have to be an expert in order to start your practice. “You’re not going to understand everything on day one, or even on day 25. It’s going to be months, or even years, before you develop all those layers of knowledge,” Cox says. “Be patient.”
The information above, plus the four tips below, should give you the necessary knowledge to start your first class with confidence and end it ready to return for more.
1. Remember to Rest
Yoga isn’t as rigorous as weight lifting or high intensity interval training, but it still works your muscles and joints (which means you need to give them time to recover). Cox advises doing yoga three days per week to start.
If you’d really like to practice yoga every day, Fazzio says you can—just alternate between different types and intensities. For example, if you take Kristin’s 20-Minute Yoga Flow on the Peloton App one day, consider doing her 20-Minute Restorative Class to help you recover the next day.

Peloton App
Access thousands of classes with no equipment needed.
2. Know That Props Aren’t Just for Beginners
You can use yoga props to safely get into poses, regardless of your experience level. For example, people with short arms tend to have a harder time putting their heels on the ground in Downward Facing Dog. However, placing blocks under their hands allows them to safely access the posture in a new way.
If you’re not sure how to use a specific prop in an in-person class, ask the instructor for guidance before the session starts, Cox says. They should be able to explain how to use a blanket, strap, or other props to help you try poses you wouldn’t be able to do otherwise.
3. Use Your Breath As a Guide
Pay attention to how your breathing changes as you move through different poses. As Fazzio explains, people tend to hold their breath when a posture gets too challenging. “If you can’t breathe, back off in the posture,” she says. “You’re not going to get the benefits, and you might actually harm yourself.”
4. Be OK Doing Your Own Thing
Just because your instructor does a pose a certain way doesn’t mean you need to do the same. Forcing a posture can lead to injury and may actually work against your body’s structure. “All of our bones are different shapes and sizes, and your unique skeletal structure dictates what you can safely do,” Fazzio says.
If you’ve been in other types of group fitness classes, you might have felt pressure to keep up with every move, but yoga isn’t like that, Cox explains. Instructors offer variations of the same pose so you can make them easier or more challenging. That said, you don’t even have to take the modifications. If there’s a posture you’re uncomfortable doing or you just need a break, take a moment to yourself or do a different pose. Not only is that allowed—it's encouraged.


This content is for informational and educational purposes only and does not constitute individualized advice. It is not intended to replace professional medical evaluation, diagnosis, or treatment. Seek the advice of your physician for questions you may have regarding your health or a medical condition. If you are having a medical emergency, call your physician or 911 immediately.
Level up your inbox.
Subscribe for a weekly dose of fitness, plus the latest promos, launches, and events.
By providing your email address, you agree to receive marketing communications from Peloton.
For more about how we use your information, see our Privacy Policy.