Upright Rows Can Build a Stronger Back and Shoulders—If You Do Them Right. Here’s How
This often-overlooked strength move is a stepping stone to more powerful snatches and cleans.
By Kells McPhillips•
What Are Upright Rows?
The Benefits of Doing Upright Rows
How to Do an Upright Row
Upright Row Variations
Mistakes to Avoid When Doing Upright Rows
What to Know Before Adding Upright Rows to Your Routine
If you asked a trainer to name-drop the most important fitness moves, rows would easily make the cut. This beloved workout exercise has been endlessly modified to engage the muscles of your back, shoulders, and arms. And upright rows stand apart from the pack by allowing you to hit the deltoids and trapezius simultaneously—and even engage in some sneaky core work along the way.
Discover more ways to reach your goals with Peloton
While other row variations involve bending at the waist and pulling the weight toward your body, upright rows mix up the formula. So instead of leaning forward, you’ll take an upright stance and row the weight up the plane of the torso until your elbows form a T-shape. This tweak forces you to engage the muscles of the upper back that don’t have to work as hard in other variations, making them a great way to add variety to your usual fitness rotation.
That said, it’s a complex move and may not be suitable for everyone. Ahead, Peloton instructor Andy Speer shares all the details about upright rows, from how to perform them safely to the common mistakes he sees in class and how to realistically include the move in your routine.

Peloton App
Access thousands of classes with no equipment needed.
What Are Upright Rows?
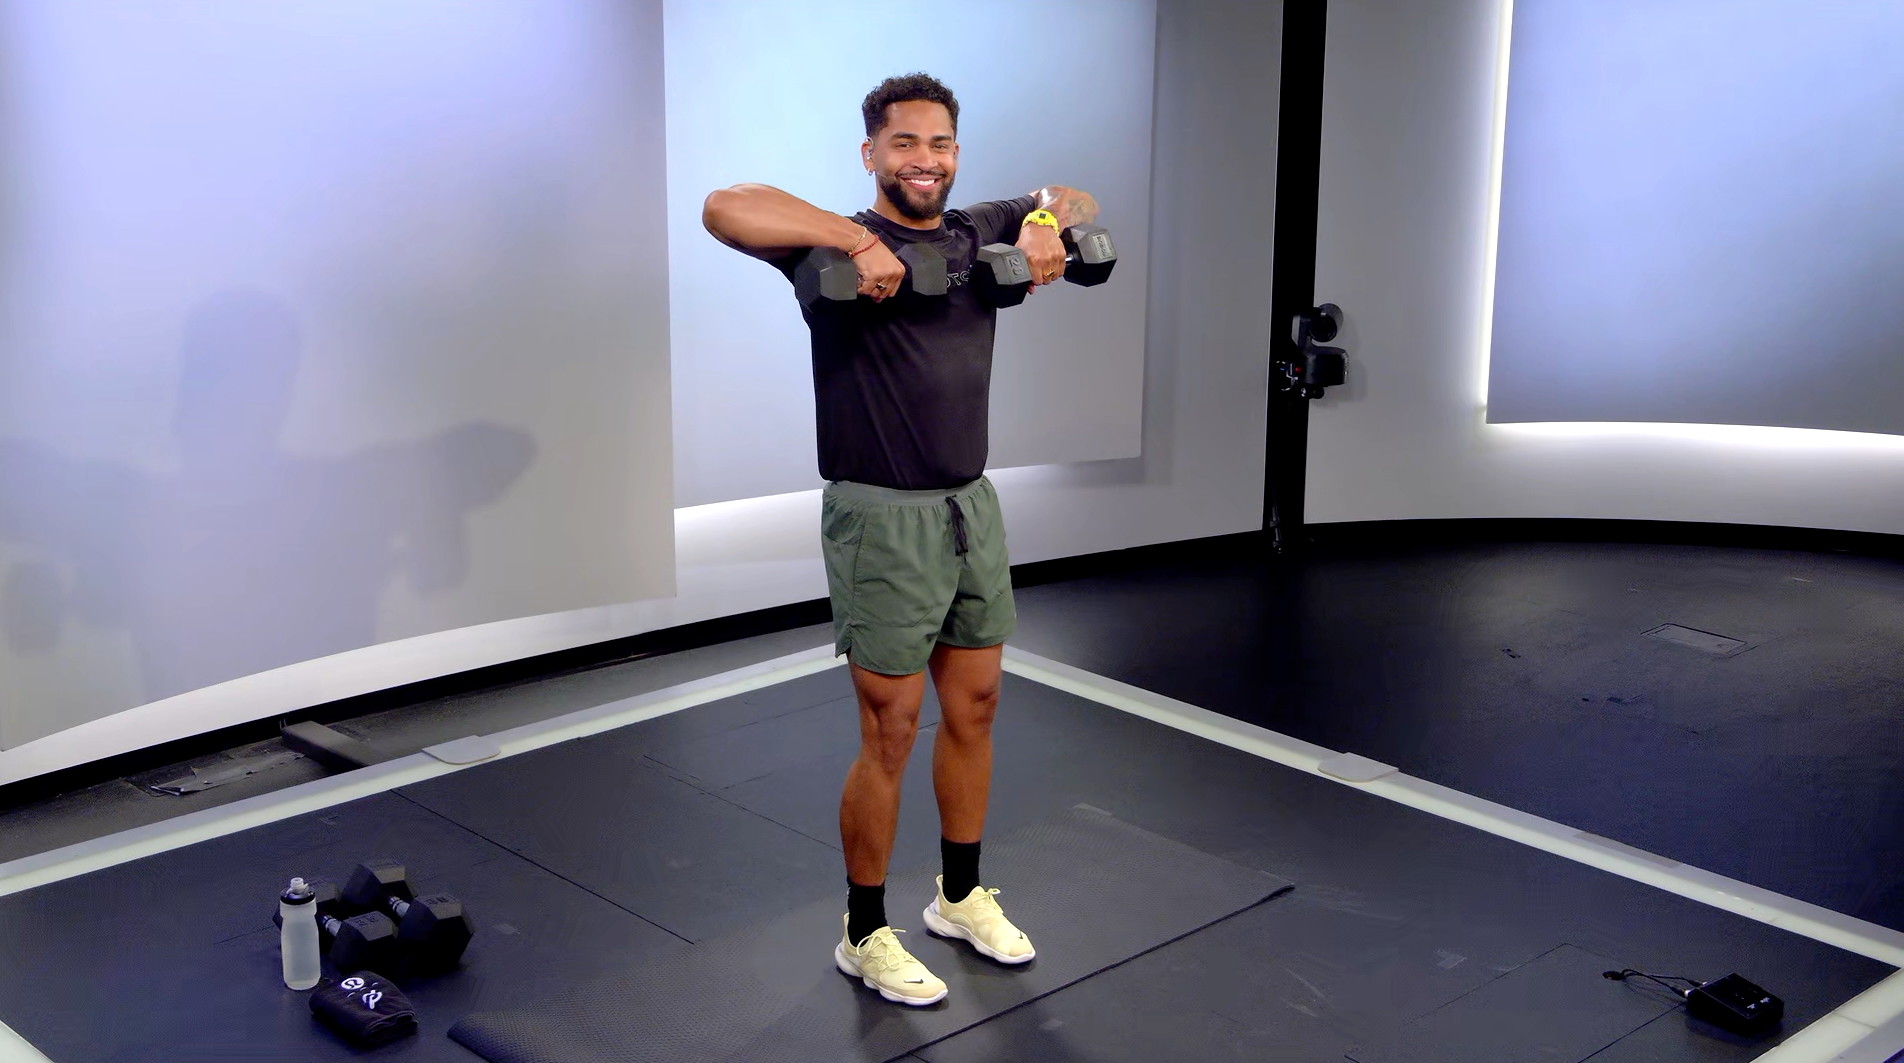
Upright rows involve standing tall, holding a weight (or weights) at hip level, then lifting the load, elbows first, to about the height of your collarbones. When doing so, you’ll engage the muscles of your shoulders, back, and triceps. You can do upright rows with dumbbells, barbells, kettlebells, or even resistance bands.
Just like squats, deadlifts, or bicep curls, rows, in general, are a staple in the world of strength training. They’re an upper-body “pull” exercise that can be performed with various types of equipment. Rows are foundational for many exercise routines—there’s a reason you’ll see them on repeat in Peloton strength classes. While you can perform rows in all different ways, upright rows are uniquely challenging because they fire up your whole body and work the tops (not just the sides) of your shoulders.
Muscles Worked by Upright Rows
Upright rows primarily target your upper back and upper arms—namely, the biceps, triceps, trapezius, and deltoids, Andy says. Your biceps and triceps lie on the front and back of your upper arm, respectively. The trapezius is a triangle-shaped muscle that sits between the upper back and neck. It stabilizes the neck, allowing you to nod, turn, or shake your head. And, finally, the deltoids (aka your shoulder muscles), which help you move your arms in different directions, are comprised of three sections: the front, lateral (side), and rear deltoids.
As you’ve probably gathered by now, these muscles do a lot to support your everyday movements, so rows are key to building overall strength and for developing functional movement patterns. “That’s generally why you would perform rows,” says Andy. “To build muscles in your traps, deltoids, a little upper back, and possibly set them up for progression for something else later on.”
The Benefits of Doing Upright Rows
In addition to strengthening the muscles mentioned above, upright rows will help you develop functional strength, or strength to perform everyday activities.
“I know not all of us want enormous trap muscles like a big linebacker, but working them in at some level can be helpful, and it can add to a lot of the muscles that are responsible for us lifting and carrying heavy things,” Andy says. Specifically, the rows you log during your workout may improve your stamina when it comes to tasks like lifting groceries, carrying a suitcase, or lifting your arm overhead with ease.
For the strength training superfans, upright rows are also a great progression exercise to introduce your body to more complex, dynamic movements that you might see in advanced dumbbell, kettlebell, or barbell work. “When done well, it’s a great movement for patterning things like high pulls and snatches, when you start getting the hips involved in that upright pulling motion,” Andy says. Of course, before you start exploring more complicated patterns, you’ll need to nail your upright row.

How to Do an Upright Row
All warmed up and ready to row? Spend some time thinking about which weight makes sense for you right now. “Generally speaking, the upright row shouldn’t be something where you’re going to fatigue,” Andy says. “So if you’re doing something for 30 seconds, find a weight where you can perform the exercise very cleanly with good posture for that amount of time or that amount of reps.” Going too heavy will likely cause your form to break down.
As far as equipment is concerned, Andy considers the dumbbell upright row to be the best starting point. “For somebody who just wants to bring them into their exercise routine and is not training for Olympic weightlifting or anything super specific or performance-oriented, a dumbbell is probably the easiest because you have a little more freedom of grip and it’s a little easier to manage the weight,” he says.
Here’s how to do a dumbbell upright row with proper form, according to Andy.
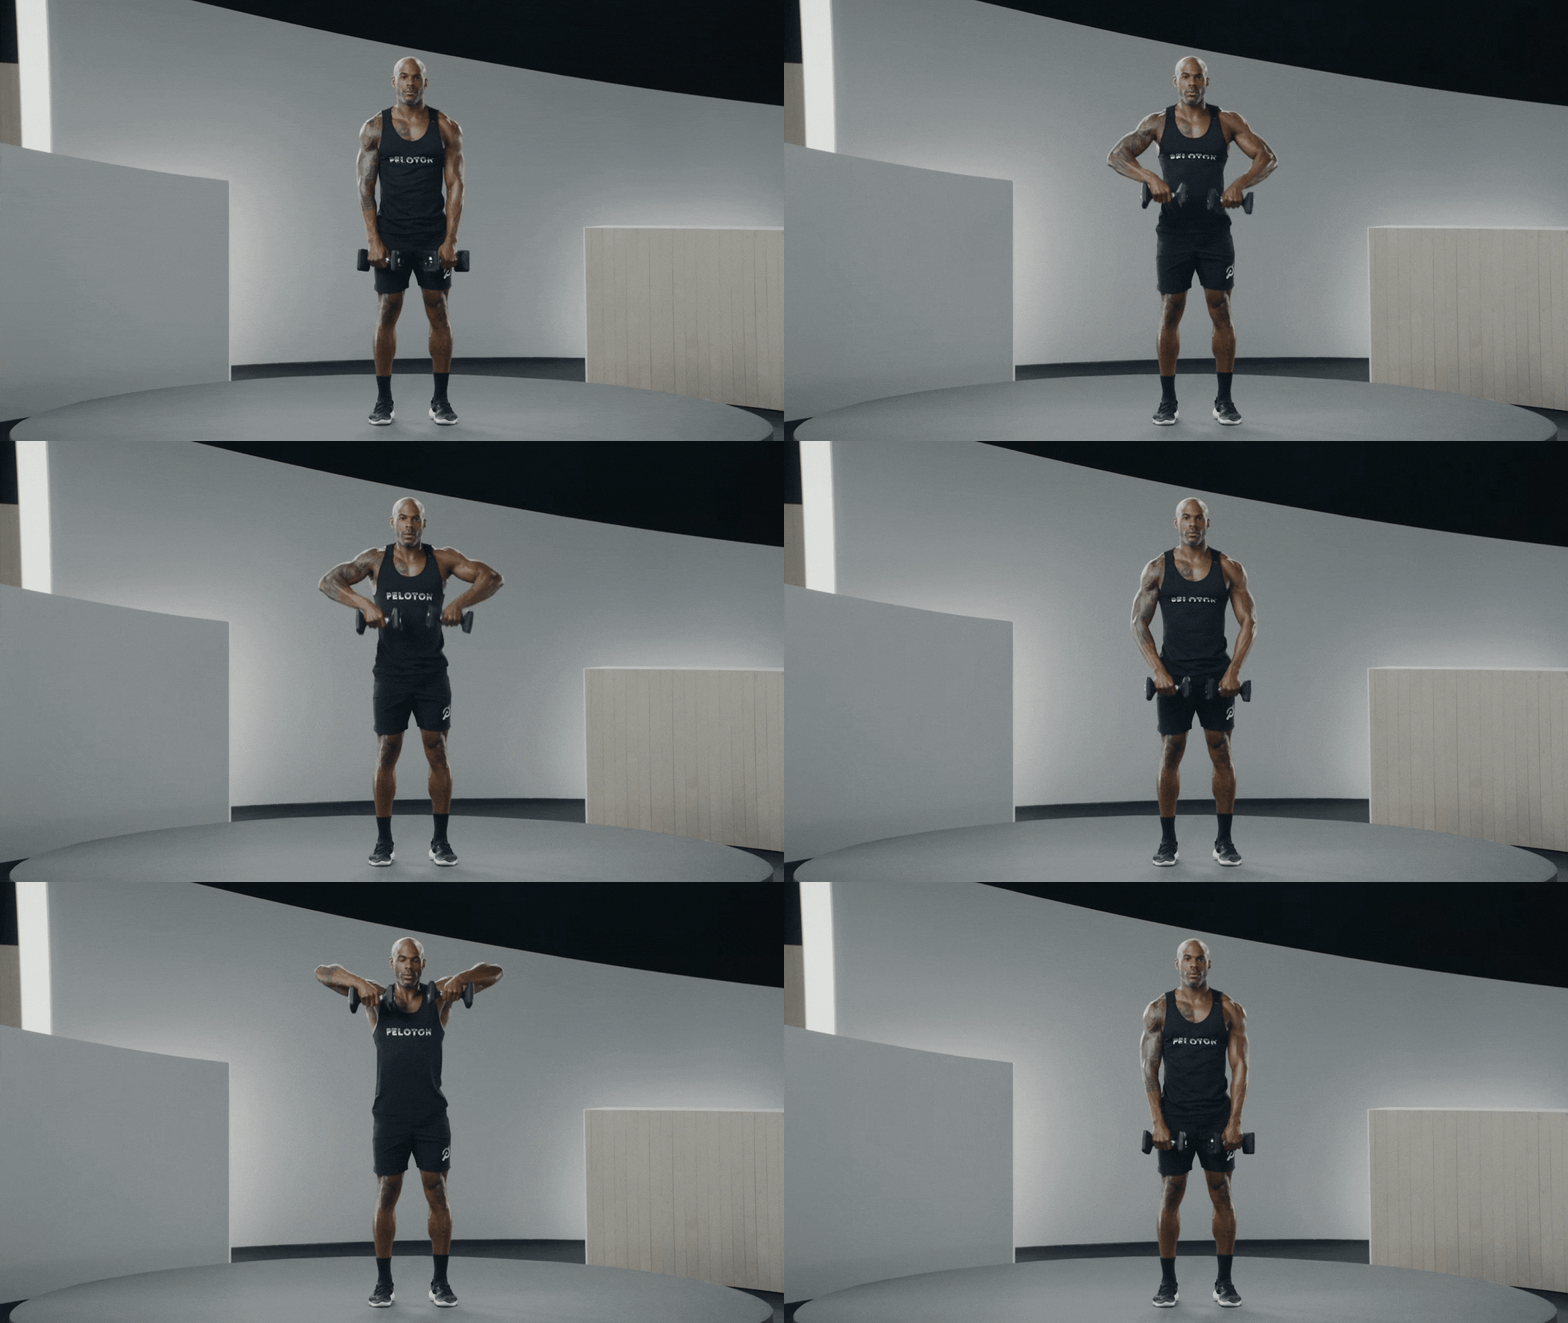
Stand with your feet hip-width distance apart, holding a dumbbell in each hand in front of your hips. Let your arms hang down in front of you so the dumbbells are lined up with your shoulders. Bend your knees slightly and engage your core.
Inhale, then exhale as you lift the weight straight up, leading the movement with your elbows so they point out to the sides. Keep your shoulder blades back and down; don’t allow your shoulders to shrug up toward your ears.
Stop when the dumbbells reach collarbone height. Pause, squeezing the muscles in your upper back, before slowly lowering the weights to return to the starting position.
Do 2–3 sets of 8–12 reps.
Upright Row Variations
As mentioned above, there are several ways to do upright rows depending on what equipment you have available and what your training goals are. Regardless of which one you choose, Andy advises engaging your core, keeping your elbows close to your body, and maintaining a straight back.

Single Arm Upright Row
Working unilaterally (i.e., one side at a time) can help you make sure you’re developing your strength equally in both arms and prompts extra activation in your core as it works to keep your body even with resistance pulling on one side. Here’s how to do a single-arm upright row with proper form:
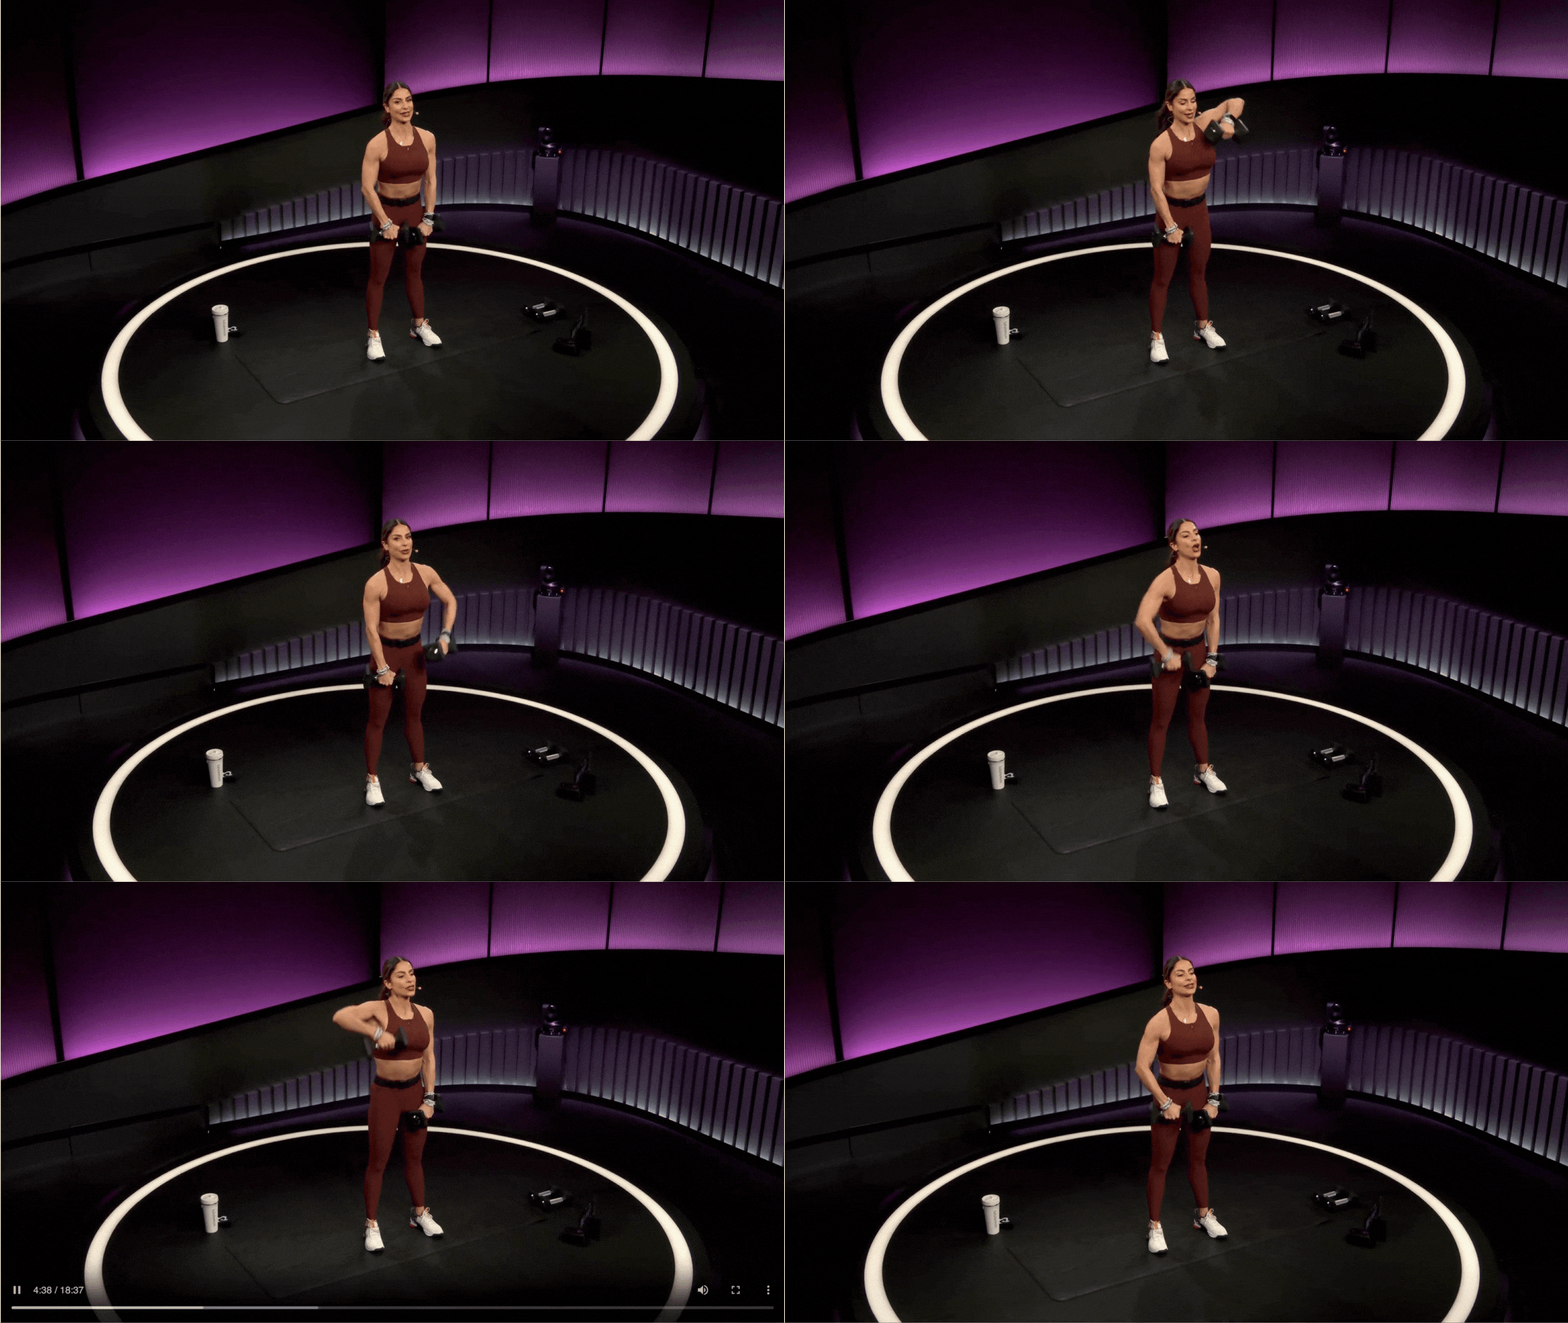
Stand with your feet hip-width distance apart, holding a dumbbell in your right hand in front of your hip, with your arm fully extended and palm facing your body. Bend your knees slightly and engage your core, and extend your left arm out to the side for balance.
Inhale, then exhale to pull the right hand up to the right collarbone, drawing the elbow out to the side. Keep your shoulders and hips square.
Slowly lower the dumbbell to return to the starting position.
Do 2–3 sets of 8–12 reps on each side.
Barbell Upright Row
“The barbell upright row is nice because it’s a fixed grip and you can really keep the bar nice and close to your chest,” Andy says. “The disadvantages are that you don’t have any flexibility with the position; as with all barbell exercises, you’re kind of locked into a fixed wrist position. If you don’t have the best wrist mobility or internal rotation of the shoulder, that can make it really easy to roll the shoulders forward,” he says—one of the biggest mistakes people make when doing upright rows. But if you’re training to do barbell cleans, snatches, or other moves where you’re using the hips explosively, barbell upright rows are a good progressive move, he notes. Here’s how to do barbell upright rows with proper form:
Stand with your feet hip-width distance apart. Hold a barbell in both hands in front of your hips, arms straight, and hands shoulder-width distance apart with your palms facing your body. Bend your knees slightly, push your shoulders back, and engage your core.
Inhale, then exhale as you row the barbell straight up, keeping it close to your body and pointing your elbows out to the sides.
Pause, squeezing the muscles in your upper back, before slowly lowering the barbell to return to the starting position.
Do 2–3 sets of 8–12 reps.
Kettlebell Upright Row
“You can definitely do upright rows with kettlebells, but this particular move is one that I prefer dumbbells over kettlebells,” Andy says. “The kettlebell just hangs vertically so much that, unless you’re doing it in the context of a snatch where you’re moving it quickly, you don’t have as much ability to kind of direct the weight position.” If you’re doing upright rows with a kettlebell, here’s how to do them with proper form:
Stand with your feet hip-width distance apart. Hold a kettlebell in both hands in front of your hips, arms straight. Bend your knees slightly, draw your shoulder blades back and down, and engage your core.
Inhale, then exhale as you lift the kettlebell up to chest height, keeping it close to your body while your elbows pull up and out to the sides.
Pause, squeezing the muscles in your upper back, before slowly lowering the kettlebell to return to the starting position.
Do 2–3 sets of 8–12 reps.
Resistance Band Upright Row
Unlike weights, resistance bands provide tension through more of a movement, and come in handy if you don’t have much space for workout equipment. For this move, you’ll need a resistance band with a handle on each end. Here’s how to do resistance band upright rows with proper form:
Stand with your feet on the center of a resistance band, one handle in each hand with an overhand grip (palms facing your body). Start with your arms fully extended in front of your body, hands shoulder-width distance apart. Engage your core, draw your shoulders back and down, and maintain a soft bend in your knees.
Inhale, then exhale to pull the handles straight up, elbows first, keeping your hands close to your body. Pause when your elbows are at about shoulder height.
Pause, squeezing the muscles in your upper back, then slowly reverse the movement, controlling the tension in the band, to return to the starting position.
Do 2–3 sets of 8–12 reps, or more if you’re working with a lightweight resistance band.
Try an Upper Body Strength Class on the Peloton App
Mistakes to Avoid When Doing Upright Rows
While upright rows may seem simple, Andy says the details count. Ahead, he shares the most common mistakes he sees in class—and how to correct them.
1. Rounding Your Shoulders Forward
“The big thing is, when you’re performing the upright row, you want to keep a nice upright posture, keep the elbows moving up and the shoulders positioned over your torso or hips,” Andy says. If you start to shrug your shoulders or allow them to roll forward, it can take the focus out of the right muscles and put you at risk of injury.
“Once you start to round forward, that’s really when we can see impingement in the shoulder,” Andy says. Impingement is when tissue in the shoulder (such as a tendon) becomes pinched or compressed, according to the Hospital for Special Surgery. “If you already have pre-existing shoulder issues, it probably won’t feel too good. And it could lead to impingement later on if you continue to do that,” Andy says.
2. Lifting Your Elbows Higher Than Your Shoulders
“As you lift the elbows, you want to keep them in line with the side of your body, and you don’t need them to go too much higher than your shoulder,” Andy says. Bringing them up too high, too far forward, or too far backward could strain your neck and shoulders. Check out your form in the mirror to make sure you’re keeping them in check.
3. Moving Too Quickly
Upright rows should generally be performed slowly with a close eye on form and posture. Performing the move too quickly without proper training could lead to injury, so keep it cool unless an instructor tells you otherwise.
4. Allowing the Weights to Drift Too Far from Your Body
Throughout the upright row, the weight should stay relatively close to your body. Otherwise, you may lean or roll your shoulders forward to overcorrect, compromising your form in the process.
What to Know Before Adding Upright Rows to Your Routine
Before you give upright rows a try, it’s worth noting that they aren’t a great choice for every exerciser. “If you lack the necessary mobility, or already have shoulder or rotator cuff issues, the upright row is not going to be the best thing for you,” Andy says. Instead, opt for other upper-back and shoulder exercises such as lateral raises and carries. “If you already have a pre-existing shoulder issue or even if your shoulder is a little cranky, this is probably not the best exercise to push on,” he says. When in doubt, check with a doctor or physical therapist before adding upright rows to your routine.
If you have the go-ahead or no existing shoulder issues, Andy recommends cycling upright rows through your training cycle just as you would any other accessory move. “It’s not one of my staple strength moves where I’d say, for example, you want some type of overhead press, some type of push, always in your routine,” Andy says. “It’s an accessory move. So rotate your accessory moves to support your big lifts and, if you love them and they don’t bother you, then that’s fine.”
Just make sure you’re balancing push and pull movements, and incorporating essential upper body moves such as pull-ups, push-ups, overhead presses, dips, and farmer’s carries.
If you find a Peloton workout you like that incorporates this move, try repeating that entire session once a week for a month before switching things up. You can then throw in other types of rows, such as renegade, wide-grip, or reverse-grip rows.
Related Articles

Strength Train
8 Rhomboid Exercises That Activate Your Back Muscles In a Whole New Way

Stretching + Mobility
Achy Back Muscles? Try These 3 Foam Roller Moves

Stretching + Mobility
Here’s How to Protect Your Lower Back During Your Next Workout

Strength Train
How to Strategically Add a Deload Week Into Your Training (and When You Should)
This content is for informational and educational purposes only and does not constitute individualized advice. It is not intended to replace professional medical evaluation, diagnosis, or treatment. Seek the advice of your physician for questions you may have regarding your health or a medical condition. If you are having a medical emergency, call your physician or 911 immediately.
Build full-body strength
Enter your email to get articles, instructor tips, and updates from Peloton sent to your inbox.
By providing your email address, you agree to receive marketing communications from Peloton.
For more about how we use your information, see our Privacy Policy.


