Miljan Živković/iStock / Getty Images Plus via Getty Images
These 9 Restorative Yoga Poses Will Give You the Relief You're Craving
Sink into your body with these soothing postures.
By Michele Ross•
If you prefer fast-paced dynamic workouts such as HIIT, rowing, and power yoga, you may see exercise as an opportunity to break a sweat and bring your heart rate up. And while there’s nothing wrong with those motivations, sometimes your body needs something a bit calmer and gentler to quite literally ground you back down to earth. You may want to consider restorative yoga, a perfect option for balancing out your workout routine while also helping alleviate stress. Read on for some of the best restorative yoga poses to try.
What Is Restorative Yoga?
When you think of yoga, you might imagine pushing back into Downward-Facing Dog (Adho Mukha Svanasana), flowing through Sun Salutations (Surya Namaskars), or going upside down into a Handstand (Adho Mukha Vrksasana). Unlike these more active postures and sequences, restorative yoga allows you to simply let go and melt into your mat.
“Restorative yoga differs from other types of yoga in that it is completely passive and supported,” says Peloton instructor Anna Greenberg. “There’s no effort from the practitioner at all to hold themselves up in any of the postures.”
Restorative Yoga vs. Yin Yoga: Key Differences
Be careful not to conflate restorative yoga with Yin Yoga. While both of these practices involve slowing down and maintaining longer holds than you’d find in other yoga classes, they’re far from interchangeable. Yin Yoga requires more effort and action—and can feel intense. “In Yin Yoga, you hold deep stretches that work on stretching the connective tissue for long periods of time, which can be very sensational,” Anna says.
Restorative yoga, on the other hand, facilitates a sense of surrender and release. “In restorative yoga, we’re not looking for intensity or deep stretches,” she says. “We’re looking for total support so that our nervous system can relax and we can tap into our parasympathetic nervous system (the rest-and-digest state).”
Restorative yoga can be the perfect antidote to stress. A 2023 study published in the Journal of Education and Health Promotion found that participants who completed a 45-minute restorative yoga session once a week over a six-week period demonstrated improvements on 13 out of 14 markers of well-being. Of these markers, participants had the most notable increases in feeling more relaxed and thinking more clearly. It’s not a surprise when you consider the roots of restorative yoga.
“One of the biggest benefits of restorative yoga is that it takes us back to that internal rest-and-digest state where we truly restore ourselves from the inside out,” Anna says. “We’re able to process experiences, to truly relax, and to fill up our own cup.”


9 Restorative Yoga Poses
Before we dive in, note that most—but not all—of the best restorative yoga poses will require props, including:
A bolster
One to two blankets
One to two yoga blocks
In many restorative yoga poses, these props can offer greater support and comfort so that you can completely relax and surrender.
GibsonPictures/E+ via Getty Images
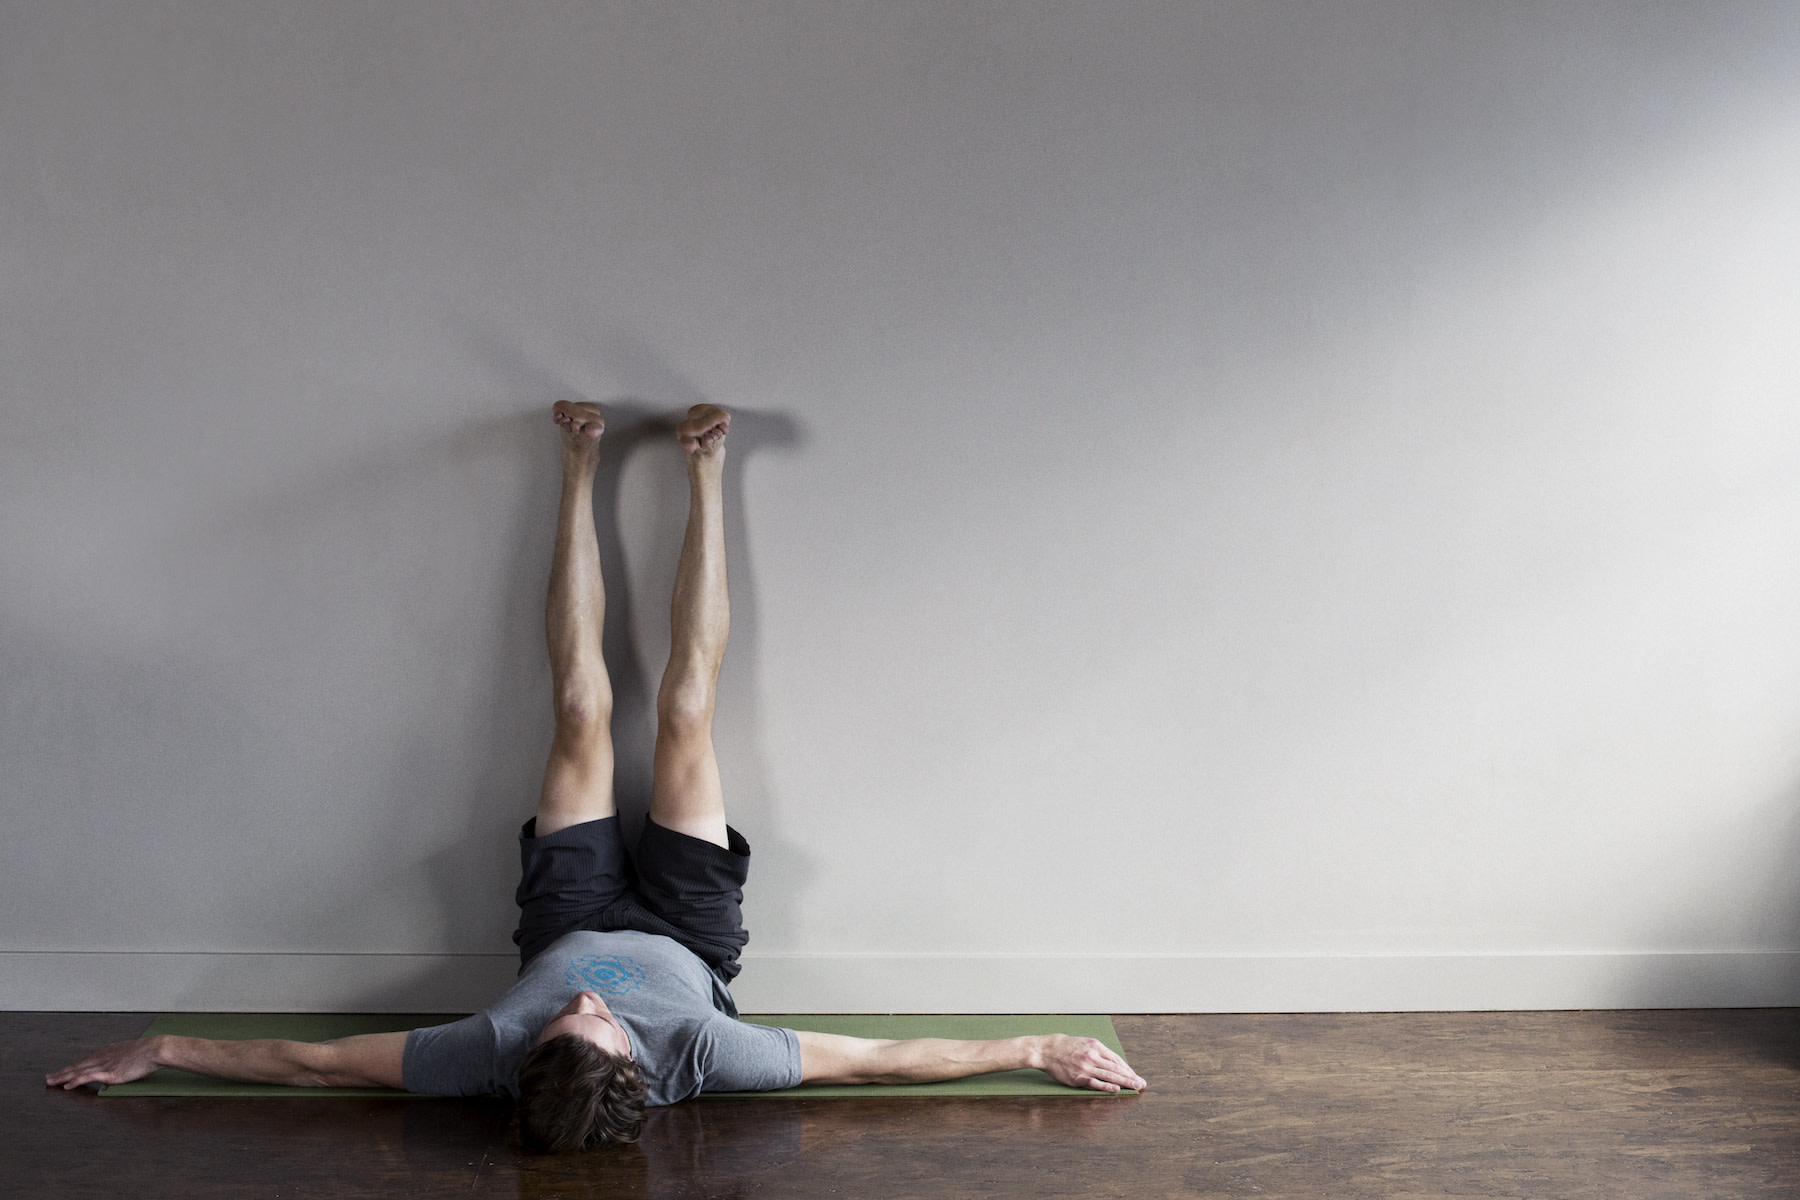
1. Legs Up the Wall Pose (Viparita Karani)
Place your mat perpendicular to a wall.
Sit with one side of your body against the wall. Lay down on the other side and swing both of your legs up against the wall.
Keep your arms relaxed. Ground your entire upper and back body from your head to your hips into the mat.
Hold here for a few minutes.
To come out of the pose, fold your knees into your chest and roll to one side before slowly sitting up.
Modify this pose by placing a bolster under your hips or using a folded blanket as a pillow for added comfort.
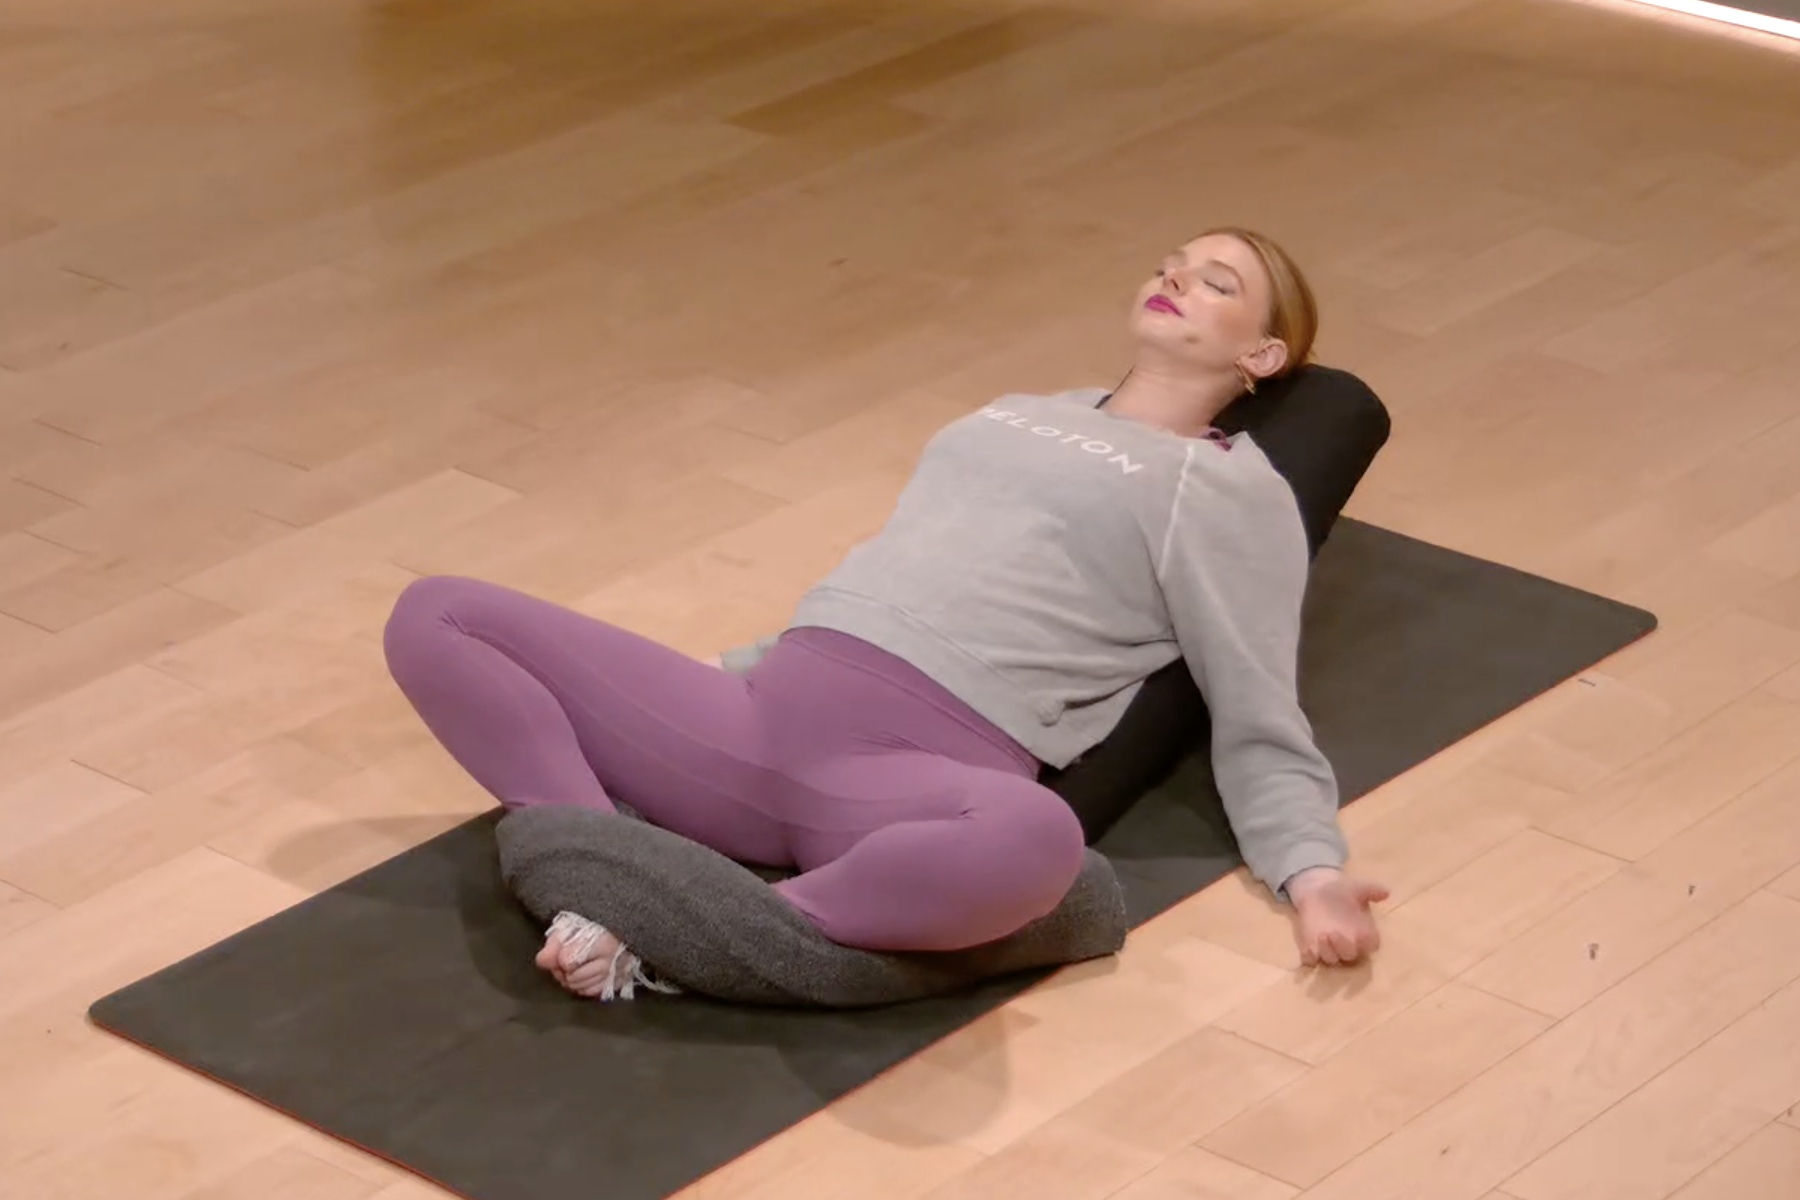
2. Supine Bound Angle Pose (Supta Baddha Konasana)
Anna identifies Supine Bound Angle Pose as her all-time favorite restorative yoga posture. “It allows everything to just relax and gently open and to feel the support underneath,” she says. For this variation you’ll need a bolster, two blankets, and two blocks.
Place one block (low and long) on your mat. Position the second block (high and wide) directly behind the first. The two blocks should touch and create a downward-sloped ramp. Place your bolster on top of the ramp.
Make a long, skinny roll with one yoga blanket. Fold your second blanket and place it on top of your bolster. The folded blanket will act as a cushion for your head.
Sit with the back of your pelvis against the bolster. Plant your feet on the mat. Keep your knees bent. Place the rolled blanket across the front of your ankles. (The tails of the blanket roll should tuck around the sides of your hips.)
Lay down onto the bolster. Open your knees out wide. The rolled blanket should catch your hips, thighs, and outer legs. Adjust the blanket as needed so that you feel completely supported. You shouldn’t feel any irritation or strain.
Keep your arms open wide. Hold the pose for a few minutes.
Anna offers a few modifications for this pose:
Placing a blanket under your head is optional. However, this prop can help you tip your chin a bit downward. “Having your nose and chin pointing toward the ceiling can be irritating to the nervous system, [so the tilt from the blanket] allows the nervous system to relax and enter the rest-and-digest state,” Anna says.
If your arms don’t easily touch the ground when you’re reclined, you can add folded blankets to support your forearms and elbows.
You can do this pose without blocks, using just the bolster. “It’s just a bit more of a chest-opening shape that way, which is also excellent,” Anna says.
3. Bolster Twists
For this restorative yoga pose, Anna cues it with a bolster and a folded blanket. You can also opt to add a second blanket.
Place the bolster vertically on your mat and turn your body to face it. Position your right hip against the front edge of the bolster. With your legs on the ground, keep your knees bent. Both of your knees should face the left. For extra cushioning, place a folded blanket between your legs. You can also put a blanket on top of your hips to help with grounding.
Tent your fingertips on either side of the bolster. On an inhale, lengthen your spine. On an exhale, gently twist to the left as you lie down on the bolster. Turn your head to face the left. For a more intense twist, turn your head to face the right. Hold for a few minutes before switching sides.
Come out of the pose slowly. Let your head be the last body part to rise.
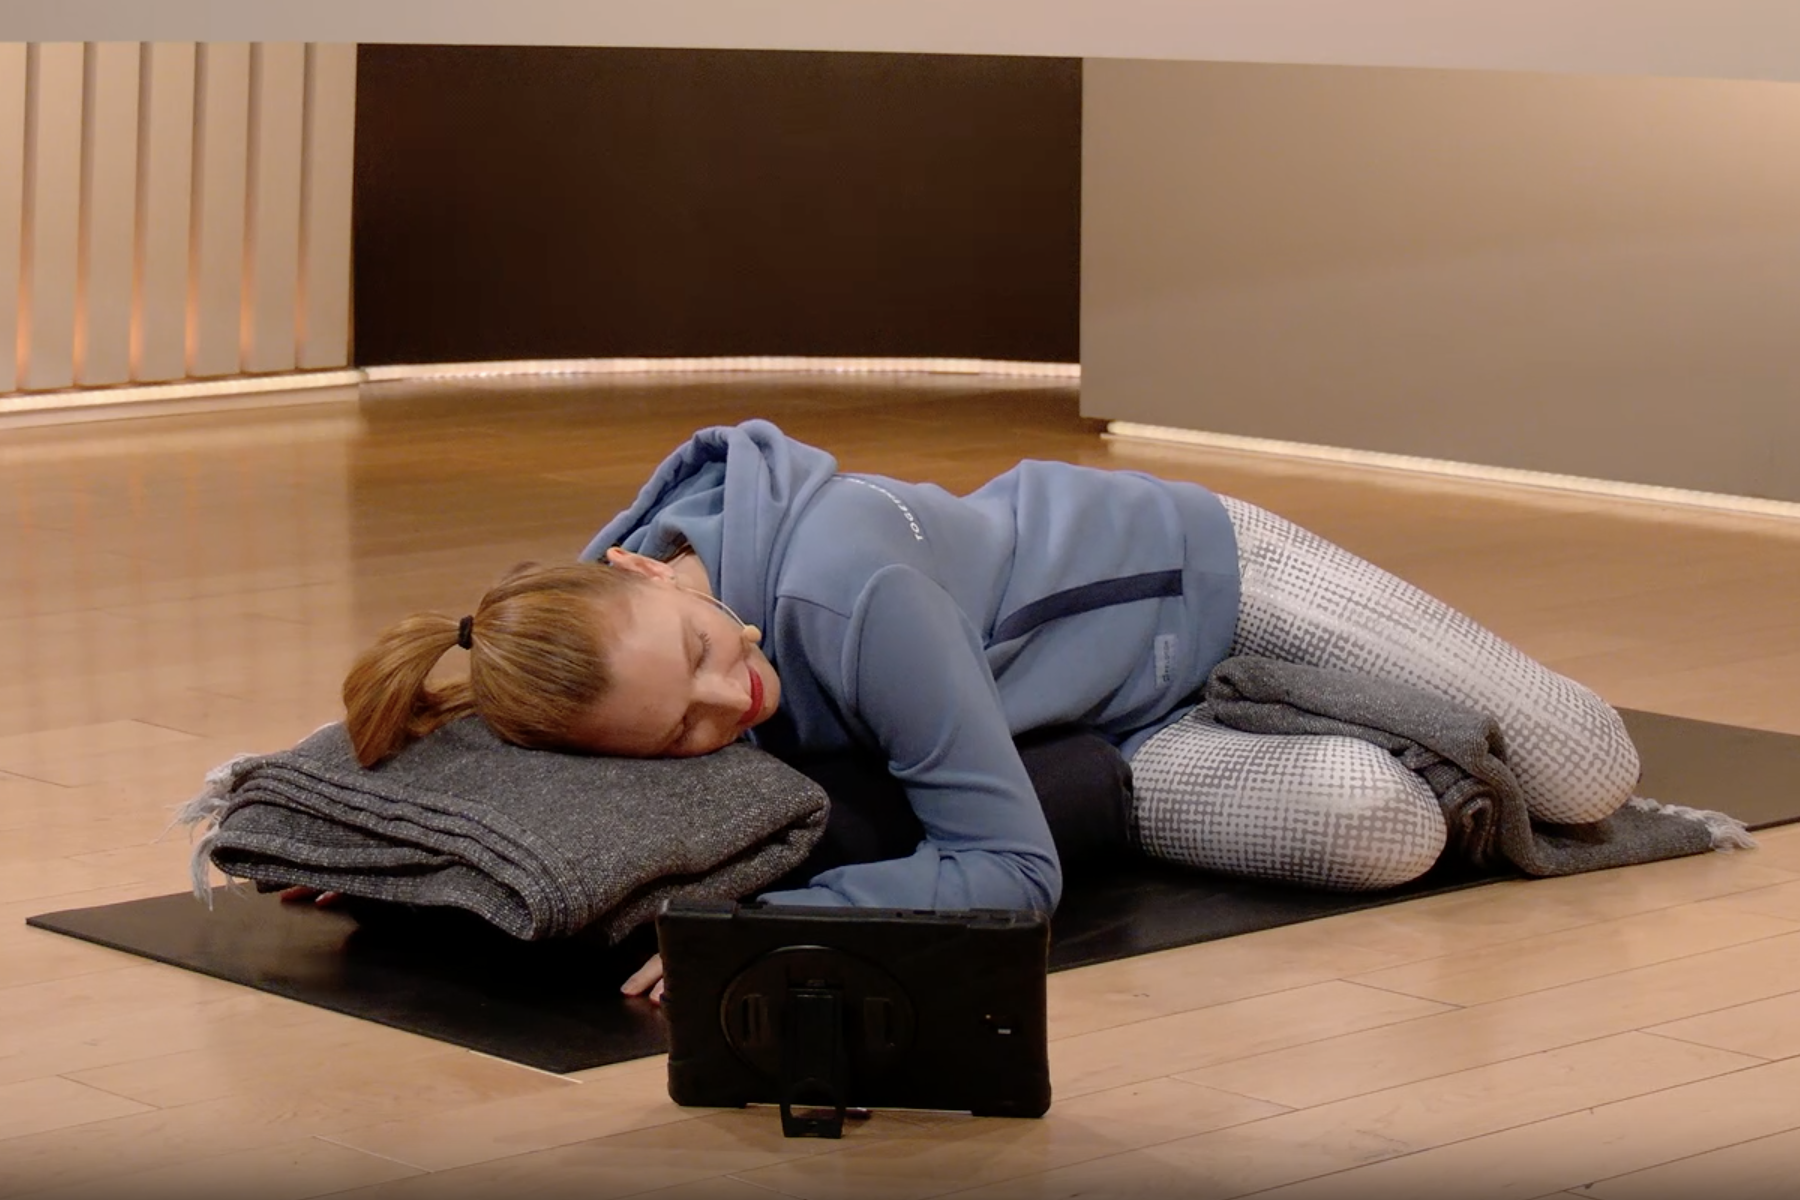
4. Supported Child’s Pose (Balasana)
“This is another great forward-bending restorative yoga pose,” Anna says. “It’s a great place to breathe into the backplane of your body, widening into the sides and areas that don’t get as much breath, space, and TLC during our daily lives.” She cues it with a bolster and a blanket. You can also add in a second blanket to ease any tension in your ankles.
Place the bolster vertically on your mat. Put a blanket on top of the bolster to cushion your knees and the tops of your feet.
Open your knees wide and scoot yourself up toward the bolster. Lay your chest over the bolster. Come into a Wide-Kneed Child’s Pose. (If you’re using a second blanket, roll it and place it under your ankles.)
Turn your head to one side. Relax into the pose. Stay here for a few minutes before turning your head to the other side.
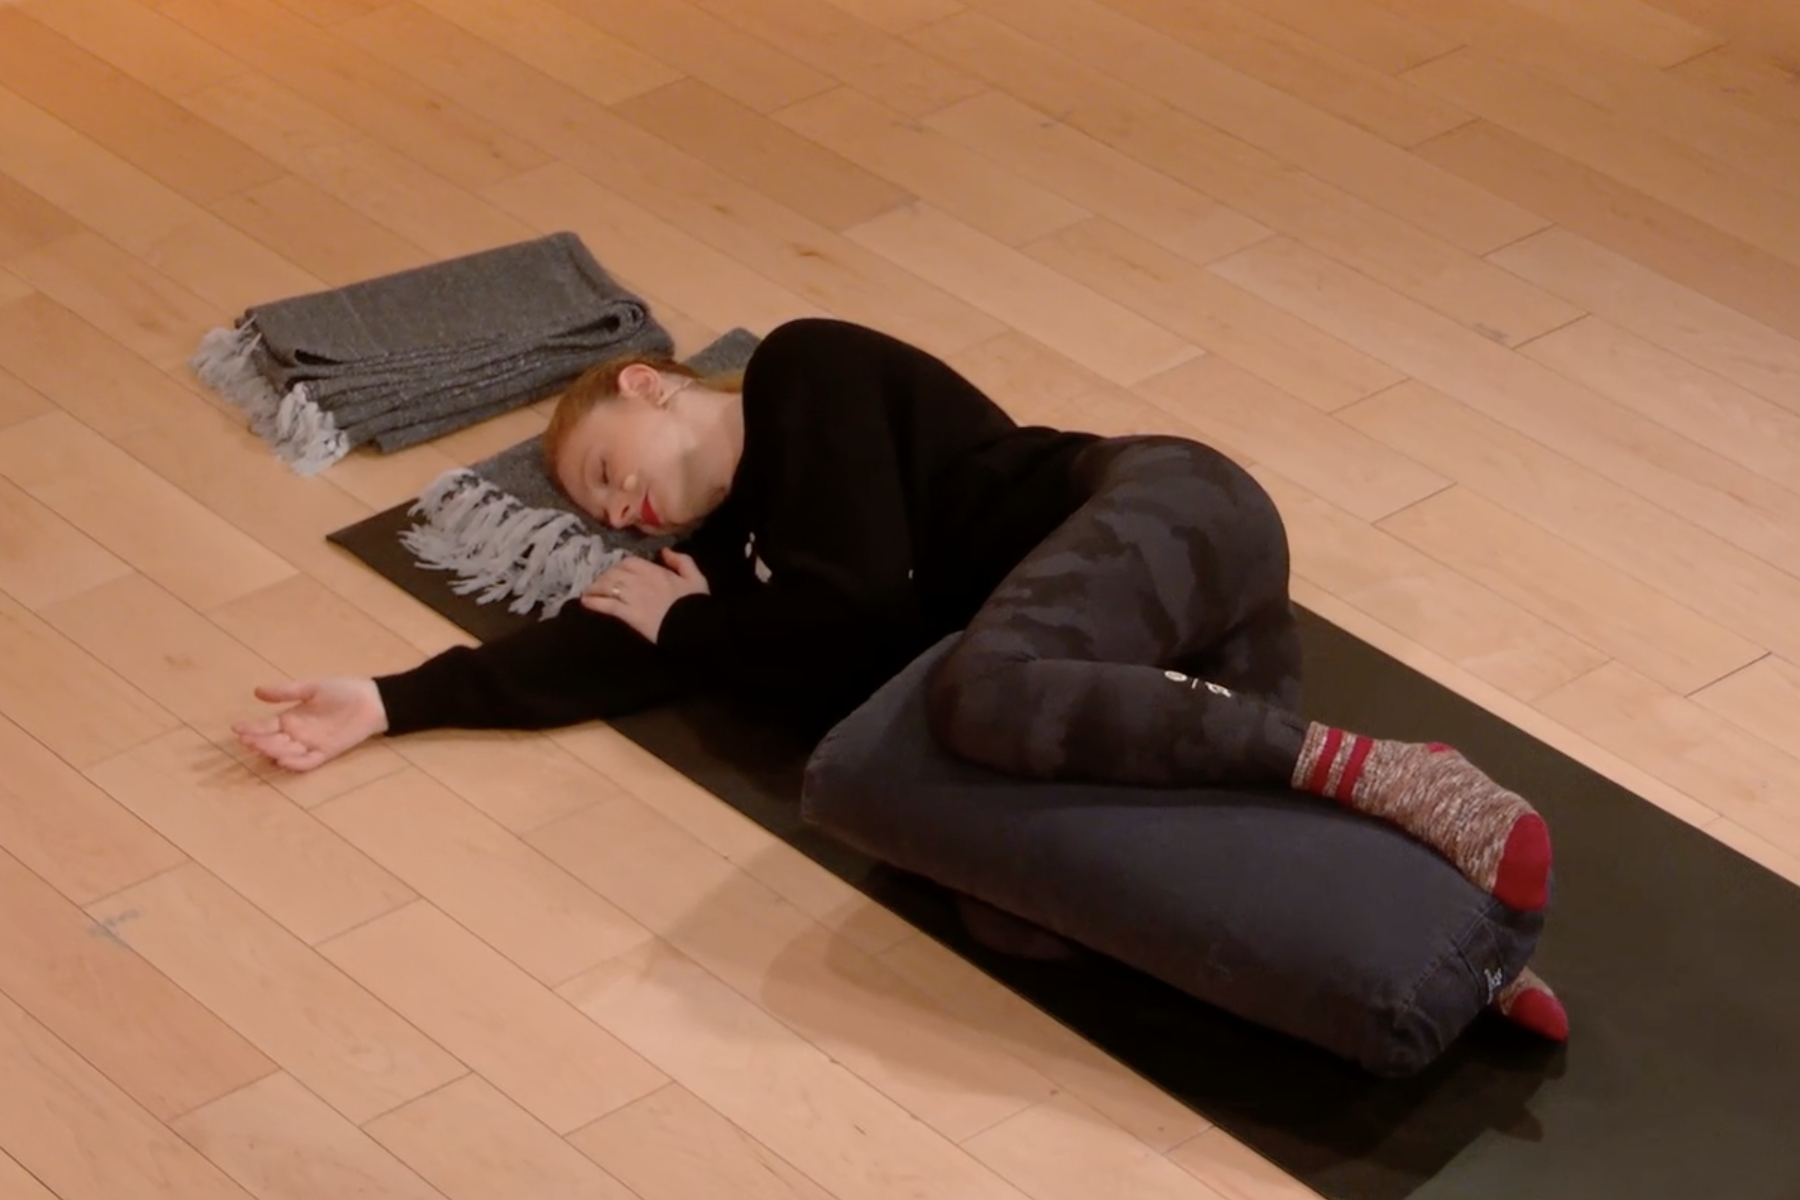
5. Side Lying Corpse Pose
Anna loves this restorative yoga pose, which promotes relaxation throughout your nervous system. Here, she cues it with a bolster and one blanket.
Create a pillow with your blanket. Lie down on your back, resting your head on the pillow.
Place a bolster (or a second blanket) between your legs. Reach your right arm out long. Turn onto your right side and come into a fetal position. Rest your left hand on the bolster, the ground, or your upper right arm.
Hold here for a few minutes before switching to the other side.
6. Supported Supine Twist (Supta Matsyendrasana)
You can come into this pose on its own—or, as Anna often loves to do, transition from the previous posture into this one. To do the transition, simply jump to step three.
Create a pillow with your blanket. Lie down on your back, resting your head on the pillow.
Place a bolster (or a second blanket) between your legs. Reach your right arm out long. Turn onto your right side and come into a fetal position.
Reach your left arm straight out to the left side to expand into the twist.
Hold for a few minutes before repeating on the other side.
7. Supported Half Frog Pose (Ardha Bhekasana)
Frog Pose is known as one of the most intense hip-openers in yoga, but the restorative version of it offers a milder, more accessible variation.
Place the bolster vertically along your mat. Lay your chest over the bolster. The bottom of the bolster should land just above your hips. Rest your left cheek on the bolster.
Bring your right knee out to the right side of the bolster. It should be parallel to your hip. Form a 90-degree angle with your right leg, positioning your right heel in line with your right knee. (For more cushioning, place an unrolled blanket under your right leg.)
Hold for a few minutes before repeating on the other side.
To come out of the pose, slowly return to the starting position before lifting up.
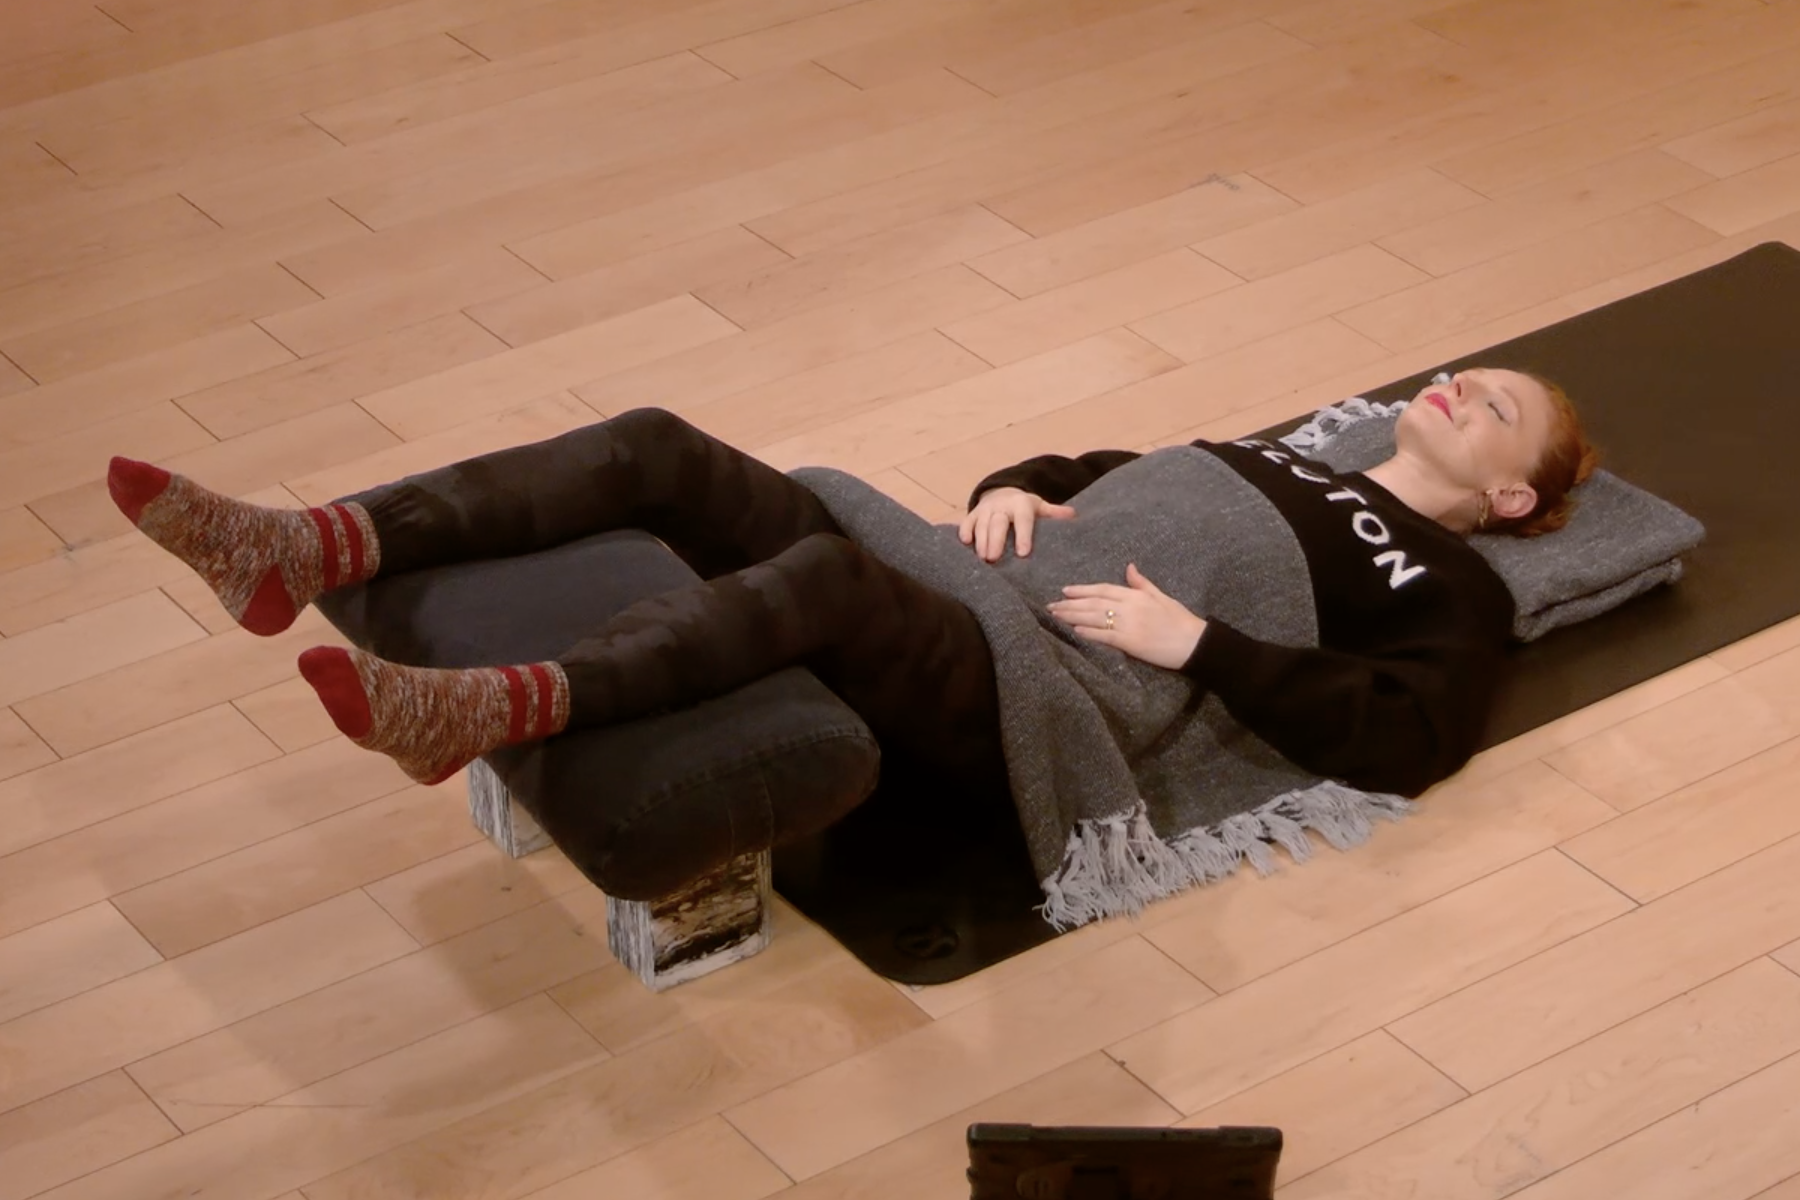
8. Stonehenge Pose
This restorative posture possesses some similarities to Corpse Pose (Savasana) and Legs Up the Wall Pose (Viparita Karani), Anna says. She cues Stonehenge Pose with a bolster, two blocks, and one blanket.
Set up two blocks on their highest height. Position them a little wider than hip-width distance apart. Place the bolster on top of the blocks. Adjust your setup so that it’s stable.
Position your calves to rest on top of the bolster before lying down on your mat. You should feel any pressure melt away in your lower back.
Hold here for a few minutes.
To come out of the pose, slide your legs off of the block-and-bolster setup.
If you don’t have any props available, you can do this restorative yoga pose with a chair. Make sure the chair is the right height and structure, Anna says. Your calves should be parallel to the mat when they’re lying on the seat of the chair.
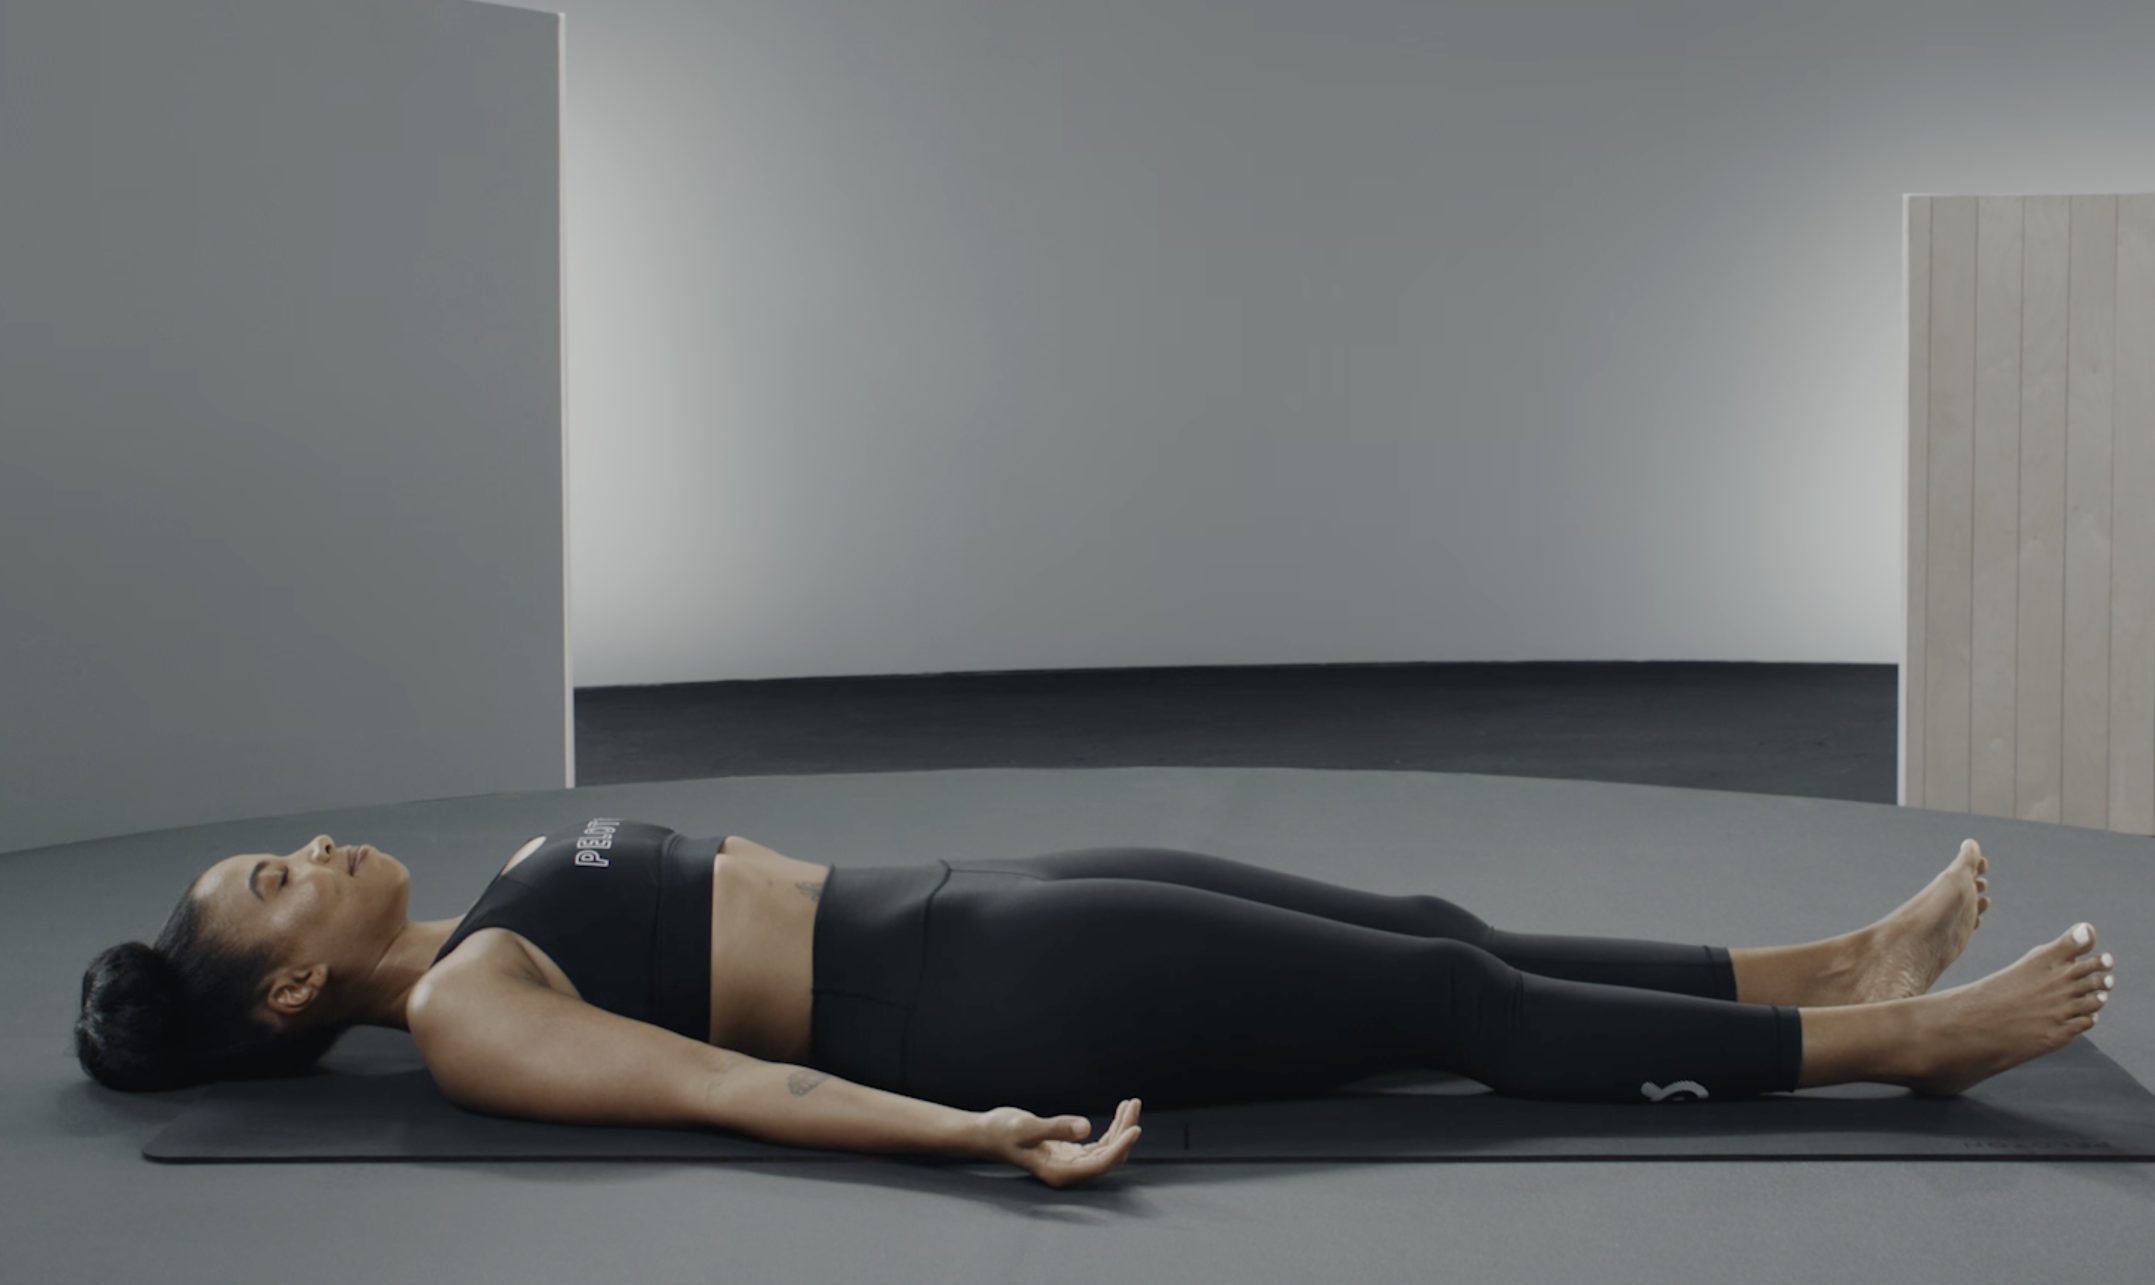
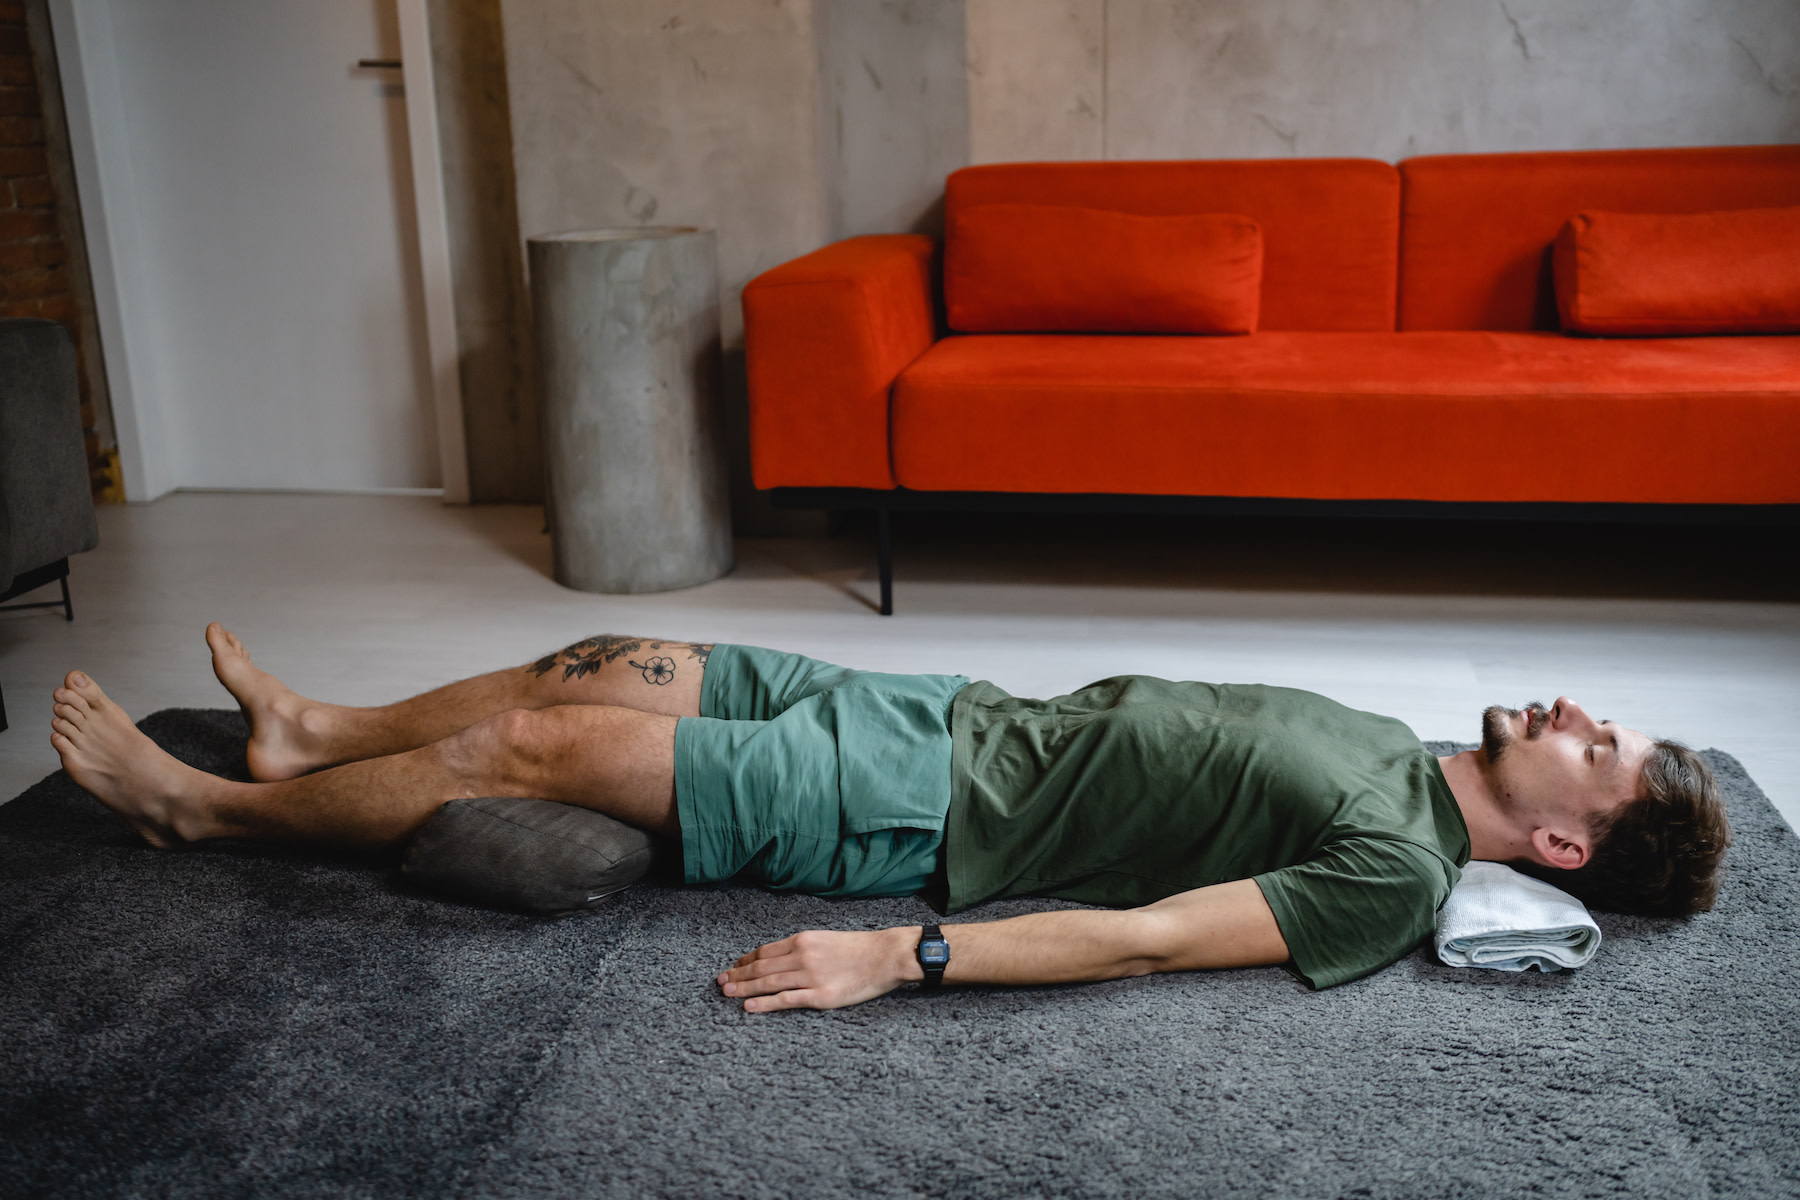
9. Corpse Pose (Savasana)
It’s the ultimate restorative pose in any yoga practice: Savasana.
Lie on your back with your legs and arms comfortably splayed out to the sides.
Relax and surrender into the mat. Stay here for a few minutes.
To come out of the pose, bend your knees in and roll over to one side before slowly rising to a seated position.
You can opt to place a bolster beneath your knees and/or cover yourself with a blanket.
How to Add Restorative Yoga Poses to Your Routine
Due to its grounding and nourishing elements, there’s no bad time to practice restorative yoga poses, Anna says. However, she adds that they can be especially beneficial:
On rest days
After an intense workout
During difficult or stressful times
Try a Restorative Yoga Class with Peloton


One of the best parts of restorative yoga is that it can soothe your mind and body. Whether your goal is workout recovery, easing your way into sleep, or calming your nerves, you can take the benefits of the practice with you—even after you walk off your mat. “If you’re feeling run-down, spread too thin, or ungrounded, any of these times are really great opportunities to check in, to nourish yourself, and allow your body and mind to restore themselves,” Anna says.
Want to strengthen your yoga practice?
We can help. Enter your email to get articles, instructor tips, and updates from Peloton sent to your inbox.