© Michela Ravasio/ Stocksy United
How to Do Half Moon Pose, According to a Pro Yoga Instructor
Want to nail this peak posture? These are the variations and tips your practice needs.
By Michele Ross•
The Benefits of Half Moon Pose
How to Do Half Moon Pose: Step-by-Step Instructions
Half Moon Pose Variations
Tips for Half Moon Pose
Whether you’re a new yoga student or have practiced for years, there’s a high likelihood you’ve encountered half moon pose. Known as ardha chandrasana in Sanskrit, this balancing posture is frequently incorporated into classes as a peak pose—a around which a sequence is built.
Discover more ways to reach your goals with Peloton
Depending on whom you ask, half moon is considered to be an intermediate to advanced yoga pose… yet this can be subjective. Whether you’re looking for an accessible variation or a way to level up this posture, we’ve got you covered. Here, we break down everything you need to know about half moon pose.
The Benefits of Half Moon Pose
It’s about more than just checking a peak pose off your list. Half moon pose helps develop your strength, balance, and focus. When it comes to your muscles and joints, this posture engages your thighs, hips, ankles, and feet, says Peloton instructor Nico Sarani. If you opt to stretch your arm upward or over your head, you’ll also engage your core, shoulder, and arm muscles, she adds.
You may notice your mood and mind shifting in this pose. There’s a reason for that. “As a hip opener, it may help release stuck emotions and stress,” Nico says. By opening your chest, and subsequently your heart, it can energize you and enable you to be more open toward your surroundings, she adds. There’s also the element of balance. As a balancing posture, half moon pose can boost your mental focus and determination while also calming your mind. “When we learn to keep our balance in tricky or challenging situations on the mat, we can bring this wisdom into everyday life,” Nico says.
How to Do Half Moon Pose: Step-by-Step Instructions

This pose isn’t simple. Since it simultaneously challenges your balance, strength, and focus, it’s critical to know how to practice this posture correctly. Here, Nico breaks down the steps you need to know to nail this pose.
Position your legs approximately 4 feet apart. Your right foot should point toward the top of your mat. Your left foot should be parallel to the back edge of your mat.
Form a "T" shape with your arms, bringing them to shoulder height. Straighten your right leg.
Shift your torso over your right leg and reach your right arm forward. Keep your spine and right leg straight.
Reach as far forward as possible with your right hand before allowing it to touch the ground near your right foot. (It can also rest on the shin of your right leg.) Reach your left arm toward the ceiling. (This is triangle pose.)
Bend your right leg. Lower your upper body toward the ground. Place your right fingertips slightly ahead of your right foot on the floor. (If it’s difficult to reach the ground with your hand, use a block to bring it closer to you.) Shift your weight forward. Lift your left foot off the mat.
To help stabilize your body, choose a fixed point on the floor to look at. Keep a soft gaze.
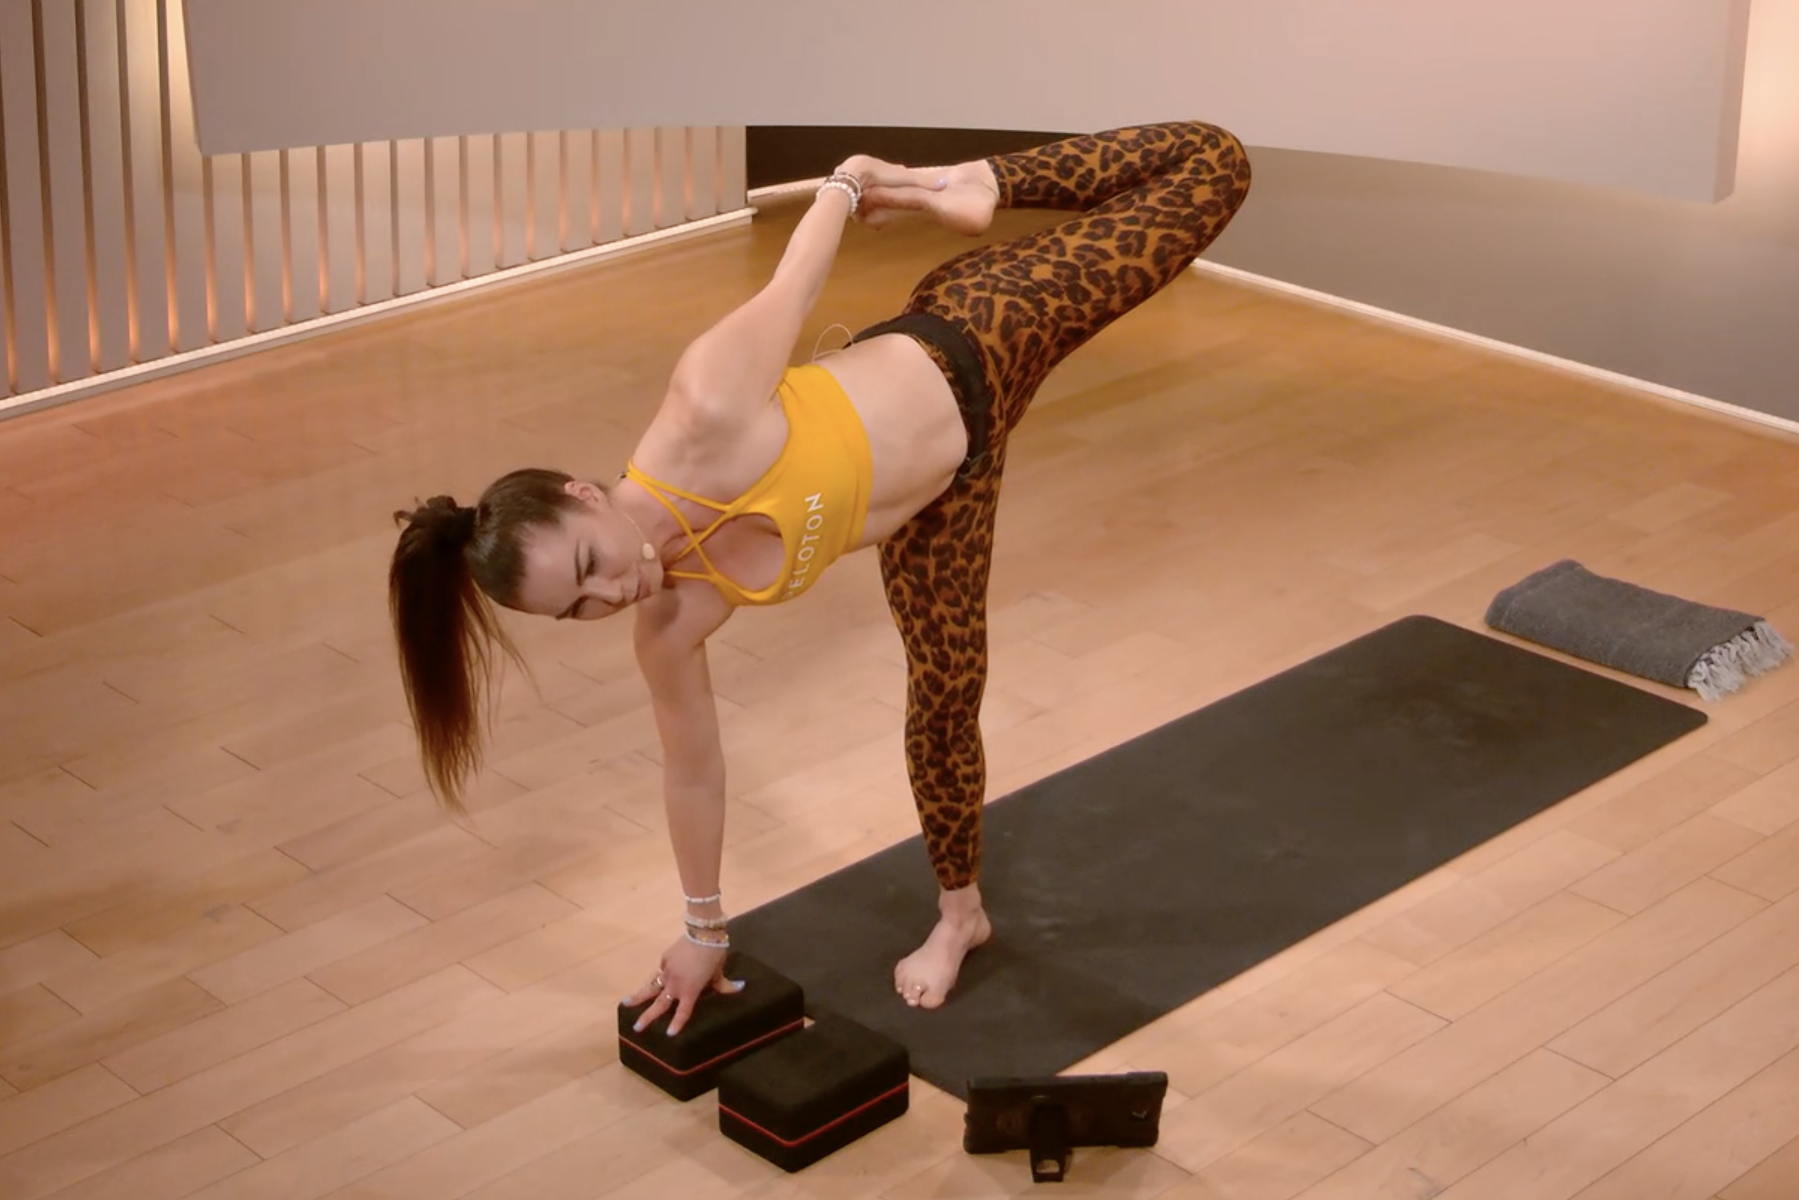
Stretch your left leg back behind you as you open your hips. Your left leg should be parallel to the mat. Flex your toes to engage your leg. Keep a slight bend in your right knee to maintain stability.
Engage your core. Draw your shoulder blades together. Spin your torso to the left to open your chest.
Extend your left arm upward. If possible, lift your gaze toward your left fingertips.
Carefully exit the pose by slowly transitioning back to triangle pose.
Repeat on the opposite side.
Half Moon Pose Variations
Whether you need to make half moon pose more accessible or want to progress into an advanced iteration, there’s a variation for you.
If You Can’t Bear Weight on a Single Leg…
Practice with your knee down on the mat. In this variation, your right knee and shin (versus your foot) will stay rooted into the mat. Proceed with the rest of the steps of standard half moon pose.
If You’re Struggling to Get Your Back Leg Parallel to the Mat…
Practice half moon pose by a wall. To do this, bring your mat perpendicular to a wall. Stand toward the top of your mat, facing away from the wall. As you work your way into half moon pose, “stamp” your left foot into the wall. Over time, aim to put less pressure on your left foot, so you’ll be ready to practice the pose without the extra support.
If You Can’t Keep Your Balance and/or Your Chest Is Caving in…
Place a block under your right hand. Doing so will raise the floor toward you, allowing you to feel more secure, supported, and safe to expand. (Don’t forget to keep your body parallel to the mat.) Over time, aim to place less weight on your right hand, instead focusing on lifting your body with your core and lower body.

If You Want to Try an Advanced Variation of Half Moon Pose…
Try sugarcane pose. To practice this challenging posture, start in half moon pose. Bring your left foot toward your glutes. Grab hold of your left foot with your left hand. Push your foot into your hand as you pull it in toward your body. Open your chest forward, so your top body creates a bow-like shape. Hold while maintaining a steady breath. Slowly exit the pose by releasing back into half moon pose, followed by triangle pose. Repeat on the opposite side. (Note: Feel free to use a block for your right hand as needed.)
If You Want to Test Your Balance in Half Moon Pose...
Place your right hand at your heart’s center. This variation will fully activate your core and standing leg.
Tips for Half Moon Pose
Whether you’re moving into half moon pose for the first or hundredth time, keep these tips front of mind.
1. Sustain a Steady Gaze
Known as your drishti, the fifth limb of yoga, maintaining a soft and steady gaze is crucial in this pose, Nico says. Select any unmoving point to be your focal point: a crack on the floor, your water bottle, or even your couch corner. Maintaining this gaze will help keep your focus and balance in check.
2. Warm Up Properly
If you’re practicing on your own (outside of a yoga class), make sure to warm up your body before moving into this peak posture. Nico recommends moving through poses such as supported side plank (with the back foot lifted), triangle pose, and tree pose to help set your body up for success—physically and mentally.
3. Remember to Breathe
It’s simple—but so important. “If we breathe smoothly and steadily, it helps us balance and stay in the moment, which helps us stay in the shape,” Nico says.
Common Mistakes in Half Moon Pose
Unfortunately, there are mistakes to be made in this complex pose. According to Nico, some of the most common errors are:
Not warming up properly
Locking out the knee of the standing knee
Allowing the gaze to wander
Not keeping the lifted leg straight
Make sure to move slowly—and carefully—in and out of this posture. By maintaining control, you'll be able to reap both the physical and mental benefits of half moon pose.
This content is for informational and educational purposes only and does not constitute individualized advice. It is not intended to replace professional medical evaluation, diagnosis, or treatment. Seek the advice of your physician for questions you may have regarding your health or a medical condition. If you are having a medical emergency, call your physician or 911 immediately.


