
Everything You Need To Know About Foam Rolling
Your muscles are going to feel better than ever.
By Karen Asp•
What Is Foam Rolling?
Benefits of Foam Rolling
How To Use a Foam Roller
Our 5 Favorite Foam Rolling Exercises
Is Foam Rolling Safe?
How to Choose a Foam Roller
How to Incorporate Foam Rolling Into Your Routine
At the gym, you may have seen a dense cylinder made of foam propped up against the corner and wondered what you were looking at. That, friends, is a foam roller—the fitness tool so many of us love to hate and hate to love. It’s the answer to your chronically tight muscles and post-workout soreness—and when used correctly, foam roller exercises can be a key part of your warm-up routine.
But if you’re not sure how to use a foam roller—like, at all—we’ve got you covered. We tapped Peloton instructors—including Hannah Corbin, the queen of foam rolling and stretching—to dish on everything you need to know about how to use a foam roller and why you should make it a regular part of your workout routine.
What Is Foam Rolling?
Foam roller exercises use a cylindrical tool called a roller that’s made of compressed foam or a polymer blend. Rollers can range in density from soft to hard, but they all do the same thing: “Foam rolling is a DIY myofascial release technique where you push your muscles against a hard surface that rolls to alleviate muscle tension and soreness,” says Hannah, who teaches foam rolling classes.
So just how important is myofascial tissue in your everyday movement? If you’ve ever felt like you’ve got a “knot” in your shoulder, that’s your myofascial tissue. Got a tight neck or back? It’s connected to your myofascial tissue. Think of myofascial tissue as your body’s scaffolding, a network of tissue connecting your muscles, joints, and bones while also providing essential support to your organs too. Tight myofascial tissue can impact and restrict the range of motion in your muscles and joints, leading to a potential indirect effect of further stress and strain to other areas.
To bring it back to foam rolling exercises, then, myofascial release is a massage technique that helps alleviate this discomfort or tightness by stretching out and moving your muscles and fascia.
Foam rolling not only relieves tight muscles but can also help make you a better athlete, Hannah says. Rolling increases your range of motion and helps correct muscle imbalances from repetitive or dysfunctional movements.
No matter what your fitness goals are, regular foam rolling can make a big difference. “Foam rolling gives me the peace of mind that I am caring for my body the way it needs,” Hannah says. “I've found more length with it in my stretches and more emotional well-being from the tension relief it provides. I honestly don't know where I would be without it—probably hunched over a pulled muscle somewhere, wishing I had used a foam roller!”
Benefits of Foam Rolling
From easing pain to improving posture, grab your roller and discover how foam rolling exercises could help your body and wellbeing.
Ease muscle pain and soreness: Studies show that foam rolling applies pressure to areas that are sore or tight, helping them to relax. It helps to lengthen muscles, stretching them out—which can be effective for alleviating pain or discomfort.
Prepare your body for more intense movement: Increasing the temperature of your muscles before a workout is key to preventing injury or strain, and foam rolling exercises as part of your dynamic warm up could be helpful in loosening up the tissue, helping you move better during your workout.
Post-workout recovery: A recent study found that foam rolling immediately after exercising can help with preventing or treating delayed onset muscle soreness (DOMS). The study showed a decreased intensity of muscle soreness after a workout when the participants used foam rollers, making it a great go-to option for cool-down exercises or an active recovery day.
Increased range of motion: Foam rolling exercises, combined with static stretching, have been shown to help improve range of motion—vital for flexibility and performance.
Reduce risk of injury: Potentially helping you be a better and safer athlete, recent research suggests foam rolling helps correct muscle imbalances caused by dysfunctional movements, stress, poor posture, repetitive movements, or an injury.
Increase relaxation: Research suggests that the perceived stretching and “releasing” effect can increase your serotonin levels and help you feel like you’re unwinding and de-stressing your body. There’s also many who swear by foam rolling before bed to help roll out the tension from the day and improve their sleep.
Improve posture: Prolonged sitting can cause certain muscles to get stiff, tight, or weaker over time, while others may tighten. Consistent foam rolling can be helpful in reducing the types of muscle tension that can lead to poor posture, while working out knots and improving blood circulation.
Related Articles

Stretching + Mobility
Why We Love The World’s Greatest Stretch (and How To Do It)

Stretching + Mobility
Yes, You Can Stretch Too Much—Here Are Signs You Might Be Overdoing It

Stretching + Mobility
What You Need to Know About Static Stretching—and When to Do It

Stretching + Mobility
Peloton’s Ultimate Guide to Mobility Training
How To Use a Foam Roller

Try a quick foam rolling class as a test drive (and if you’re not sure where to start, fire up the Peloton App and search under Stretching). You want to foam roll regularly—at least a few times a week, or every day if possible, because you get the most benefits from the foam rolling exercises when you stay ahead of muscle soreness. “If you’re waiting until your muscles are overly sore to do foam rolling, it’s like throwing onions at somebody who’s already crying,” Hannah says.
As you start rolling, remember that you control the amount of pressure on your body, so you can always modify as necessary. Start off using light pressure and then gradually apply more. Pro tip: If you find a particularly tight spot, hold the roller on that location for about 30 seconds before releasing.
Our 5 Favorite Foam Rolling Exercises
Foam rolling is something that all Peloton instructors incorporate into their fitness routine, as it takes stretching and recovery to a whole new level. But how do you know you’re hitting all the important areas? We’ll show you how.
Whether you target a specific body part each day or roll out your whole body in one session is your call. Of course, doing the whole body is the most beneficial, but if you have just a few minutes, you might want to focus on the muscles that feel the most tight or sore, or muscles that you’ve been using a lot in the activities you’re doing, Hannah says.
For example, cyclists might want to focus on their quadriceps, glutes, and hips, while runners may prefer to roll out their calves and hamstrings. Or, if you’re dealing with general desk fatigue, you might spend most of your time taking care of your chest and back.
Just make sure you devote equal time to both sides of the body. For example, if you’re rolling your hamstring on the right leg, make sure you do it on the left leg too. The goal is to maintain balance.
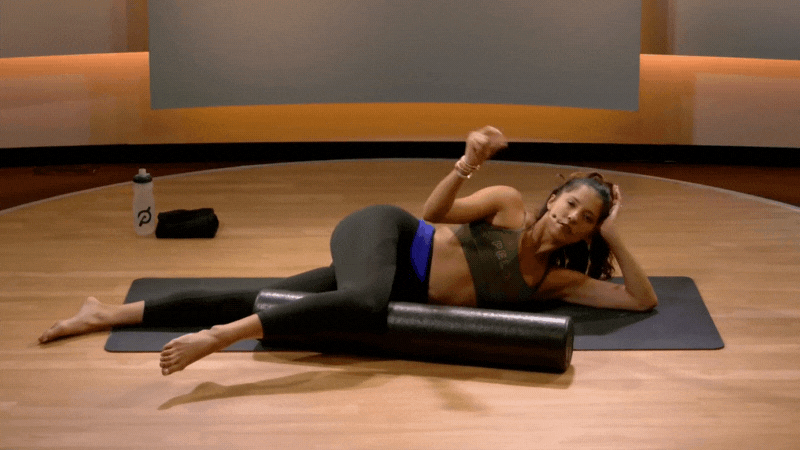
1. Quads
These big, juicy leg muscles can handle the pressure, so don’t be afraid to get in there with your foam roller. That said, if you’re new to foam rolling or feeling extra-sensitive, start by rolling both of your quads at once to distribute the weight. Once you’re ready for a little more intensity, go down to one leg at a time, as we’ll explain below.
Lie down on your front side with the foam roller perpendicular to your body, just above your knees.
Shift positions slightly so that your foam roller is only underneath your left quad. Your right leg can be off to the side and arranged however feels comfortable to you.
Roll the length of your left quad for about 30 seconds, beginning just above your knee and ending near your upper thigh. At any tender or tight spots, stop and hold for 30 seconds.
Place the foam roller back in its starting position, just above your left knee. Roll your left quad from side to side for about 30 seconds.
Move the foam roller up a few inches and roll for another 30 seconds. Continue repeating until you reach your upper thigh.
Repeat on the other side.
Muscles worked: Quadriceps, groin
2. Calves
You might be surprised at just how spicy rolling out your calves can feel, especially if you neglect stretching this lower-body muscle—so go light to start. If you find a particular knot that you want to address, try using a lacrosse ball or a tennis ball for more targeted myofascial release.
Sit on a mat with legs extended long in front of you. Place your foam roller perpendicular to your body under your left calf. Cross your right leg on top of your left (if that’s too much pressure, place your right leg on the ground).
Roll the length of your left calf for about 30 seconds, beginning just above your ankle and ending just under your left knee. At any tender or tight spots, stop and hold for 30 seconds.
Place the foam roller back in its starting position, just above your left ankle. Roll your left calf from side to side for about 30 seconds.
Move the foam roller up a few inches and roll for another 30 seconds. Continue repeating until you reach just below your left knee.
Repeat on the other side.
Muscles worked: Gastrocnemius, soleus
3. Hip Adductors
Tired quads, calves, and hamstrings get all the attention after a long ride or a tough run, but Peloton instructor Andy Speer reminds you not to overlook your adductors, the muscles along your inner thigh that stretch from your knee to your groin. “Your adductors ‘adduct’ or move your legs in toward the centerline of your body and play a role in hip stability and hip flexion,” Andy explains. “When your adductors are ‘tight’ or full of trigger points, they may not stabilize as effectively and your stride may be altered which will decrease your running efficiency.”
Lie down on your left side with your knees stacked and the foam roller parallel to the front of your body.
Lift your right leg and bend at the knee to a 90-degree angle.
Place the foam roller under your inner thigh.
Roll the length of the muscle area for about 30 seconds. At any tender or tight spots, stop and hold for 30 seconds.
Repeat on the other side.
Muscles worked: Hip adductors
4. Latissimus Dorsi
Peloton instructor Matt Wilpers notes that when you’re training your upper body, the lats are often skipped. Located on the back side of the body, these are the muscles connecting your upper extremities to your vertebral column. “It depends on how tight your muscles are, but I usually spend one to two minutes on either side,” says Matt. “Over time, if this area gets too tight, you will lose mobility.”
Lie down on your left side with your legs stacked and the foam roller underneath your left armpit.
Bend your right knee and place your right foot flat on the floor, either in front of or behind your left leg—whatever’s most comfortable.
Roll from your left armpit to your left mid-back for about 30 seconds. At any tender or tight spots, stop and hold for 30 seconds.
Repeat on the other side.
Muscles worked: Lattisimus dorsi
5. Pectoral Muscles
Another hidden area that Matt says not enough people pay attention to is pec minor, the small muscles on either side of your chest that allow your shoulders to move forward and down. “By sitting all day we can become very tight in our upper body, and our shoulders tend to roll in,” explains Matt.
If the reason you’re not foam rolling this area is simply the awkward position required to get to it, Matt suggests using a lacrosse ball to really target the muscle. “Spending one to two minutes in this area can really release and open this area up in order to strengthen your back muscles,” he says.
Lie on your stomach and place the foam roller diagonally under the right side of your chest. The top of the foam roller should be near your chin. If using a lacrosse ball, you can place it directly under your chest, close to (but not directly in) your right armpit.
Staying on your stomach, gradually apply more and more pressure from your bodyweight onto the foam roller, pulling back when it becomes too intense. Hold for 30 seconds. If you experience any numbness or tingling, pull back immediately.
Lift your right arm and gently rotate your palm to face the ceiling. Pause and hold at any tender spots.
Repeat on the other side.
Muscles worked: Pectoralis major, pectoralis minor
Is Foam Rolling Safe?
Yes, foaming rolling is generally considered a safe exercise for uninjured muscles and if you regularly exercise—but like with any other exercises or equipment, it needs to be practiced correctly. If you have a serious injury such as a broken bone or torn muscle, it’s best to speak to your healthcare provider and follow their guidance before trying foam rolling. There are also some health conditions where foam rolling is not advised unless practiced by a professional. This includes rheumatoid arthritis, osteoporosis, advanced diabetes, and cellulitis.
If you’re pregnant, foam rolling may help with relaxation and tension release, but make sure to get guidance from your healthcare provider on what foam roller exercises to do. Approved exercises will vary based on your stage of pregnancy and any preexisting health conditions.
Always make sure you’re following approved foam rolling exercises before starting. Applying pressure to areas of the body improperly can cause damage or injuries. Avoid foam rolling over small joints like knees, elbows, or ankles as this could hyperextend them.
How to Choose a Foam Roller
When you’re deciding on the best foam roller, there are three main things to consider.
Density
Choosing between a soft or hard foam roller can come down to pressure preference and experience. Soft foam rollers have more flexibility and cushion, delivering a lighter pressure for lower intensity—perfect for beginners. Giving a deeper myofascial release and massage, hard rollers may feel more intense, but they can be super effective in targeting tension and alleviating tight muscles.
Surface Texture
The texture of your roller is another way to create a more targeted foam rolling experience. A smooth roller gives a more even pressure and a lower intensity massage—again, helpful if you’re just starting out or want a more balanced touch. Texture rollers have multiple types of ridges and protrusions arranged in different combinations for a more intense pressure that targets specific pressure points or areas of tension.
Shape and Size
Foam rollers come in different shapes and sizes. Hannah recommends opting for a long roller—around 36 inches—since it’s easier to use and more stable than shorter rollers. Shorter rollers are usually around 24 inches and are good for targeting smaller areas such as calves or arms.
How to Incorporate Foam Rolling Into Your Routine
As to when you should foam roll, it comes down to personal preference. Hannah likes to do a light session before exercising to mobilize and release her muscles, and then a more intensive round afterward to target any areas that bothered her during the workout. But you can use your foam roller any time during the day or even before you go to bed, so it’s worth experimenting to find what works best for you. And if you’re not sure where to start, the Peloton App has dozens of foam rolling classes for specific muscle groups or your full body, with class lengths ranging from five minutes to a luxurious 20-minute foam rolling sesh.
This content is for informational and educational purposes only and does not constitute individualized advice. It is not intended to replace professional medical evaluation, diagnosis, or treatment. Seek the advice of your physician for questions you may have regarding your health or a medical condition. If you are having a medical emergency, call your physician or 911 immediately.
Level up your inbox.
Subscribe for a weekly dose of fitness, plus the latest promos, launches, and events.
By providing your email address, you agree to receive marketing communications from Peloton.
For more about how we use your information, see our Privacy Policy.